

Projects
Projects are the top-level containers in Routebase. Each project groups everything that belongs to one API effort and gives your team one place to work on it. That covers the API specifications, environments and variables as well as the test suites, mock servers, documentation and monitors.
The Projects page
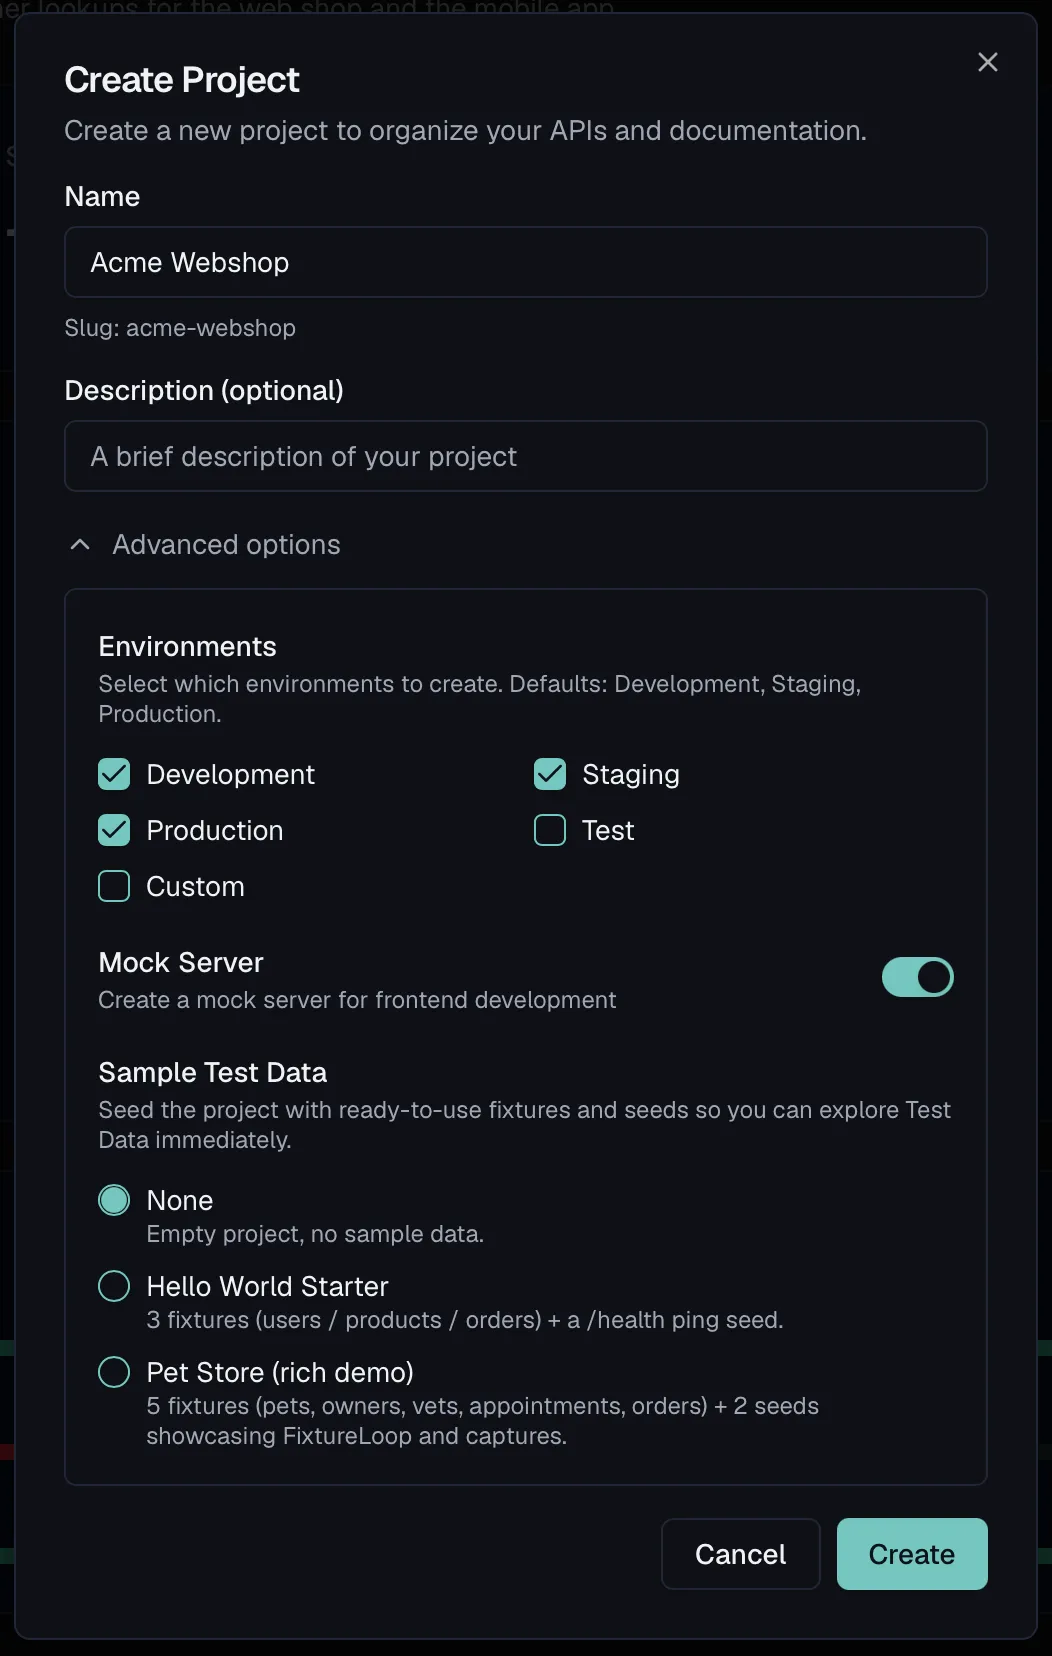
Open Projects from the main navigation. The page uses a three-column layout:
| Column | What it shows |
|---|---|
| Projects (left) | All projects in your organization. Expand a project to see its environments and their variable counts. |
| Overview (middle) | The dashboard for the selected project, with inline-editable name and description. |
| API Specifications (right) | The specs in the selected project. Click a spec to open it in the API Designer, or right-click it to rename or delete it. |
The columns are resizable, and the right panel can be collapsed. If no project is selected, the middle panel shows a Select a project empty state with a New Project button.
Creating a project
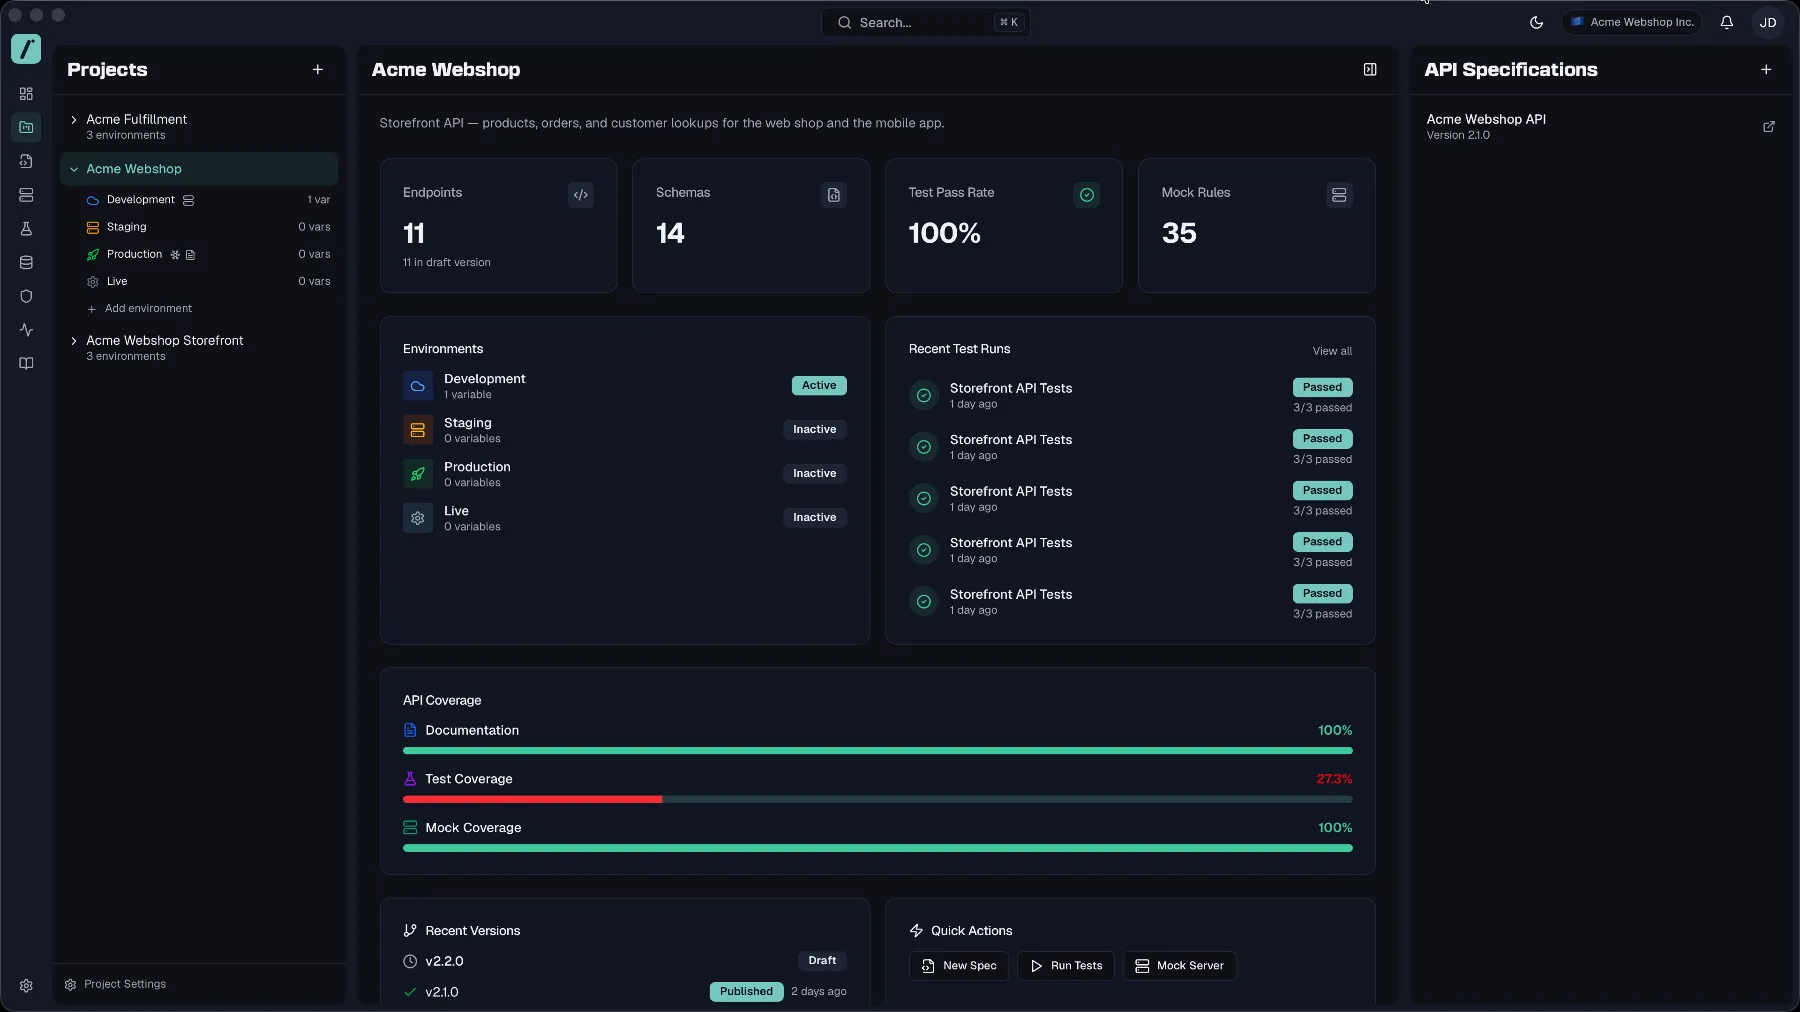
- On the Projects page, click the + button at the top of the project list, whose tooltip reads Add project. In an empty organization, click Create project instead.
- Enter a Name of 2 to 100 characters. Routebase shows a preview of the URL slug generated from the name.
- Optionally add a Description.
- Optionally expand Advanced options:
- Environments decides which environments to create. The defaults are Development, Staging and Production, and you can add Test and Custom with a name of your own. See Environments.
- Mock Server creates a mock server for frontend development right away.
- Sample Test Data seeds the project with ready-to-use fixtures and seeds. Pick None, Hello World Starter with 3 fixtures plus a
/healthping seed, or Pet Store (rich demo) with 5 fixtures plus 2 seeds. See Test Data.
- Click Create. You land directly in the new project.
The project overview
The middle panel shows a live dashboard for the selected project:
- Stat cards for Endpoints with its draft count, Schemas with its unused count, Test Pass Rate and Mock Rules. Each card links to the matching feature.
- Environments shows the project's environments at a glance.
- Recent Test Runs lists the latest runs with a View all shortcut to the test runner.
- API Coverage draws bars for Documentation, Test Coverage and Mock Coverage. Each bar measures the endpoints of the current spec version. An endpoint counts as tested once a test case calls it or links to it, and as mocked once an active mock rule answers requests to it.
- Version History shows recent spec versions.
- Quick Actions holds the shortcuts New Spec, Run Tests and Mock Server.
Renaming and editing a project
Two ways to edit:
- Inline editing starts when you click the project name or description in the overview header, whose tooltip reads Click to modify. Type your change and press Enter.
- The Edit dialog opens when you right-click the project in the list and choose Edit, and it changes the name and description together.
Deleting a project
Deleting a project permanently removes all of its data, which covers the API specifications, environments, variables, test suites and mock server rules. There is no undo.
- Right-click the project in the list and choose Delete, or open Project Settings and use the Danger Zone → Delete Project.
- Confirm in the Delete Project dialog.
Deleting requires the projects:delete permission, which Admins and Owners have, and the option is hidden for Members.
Project settings
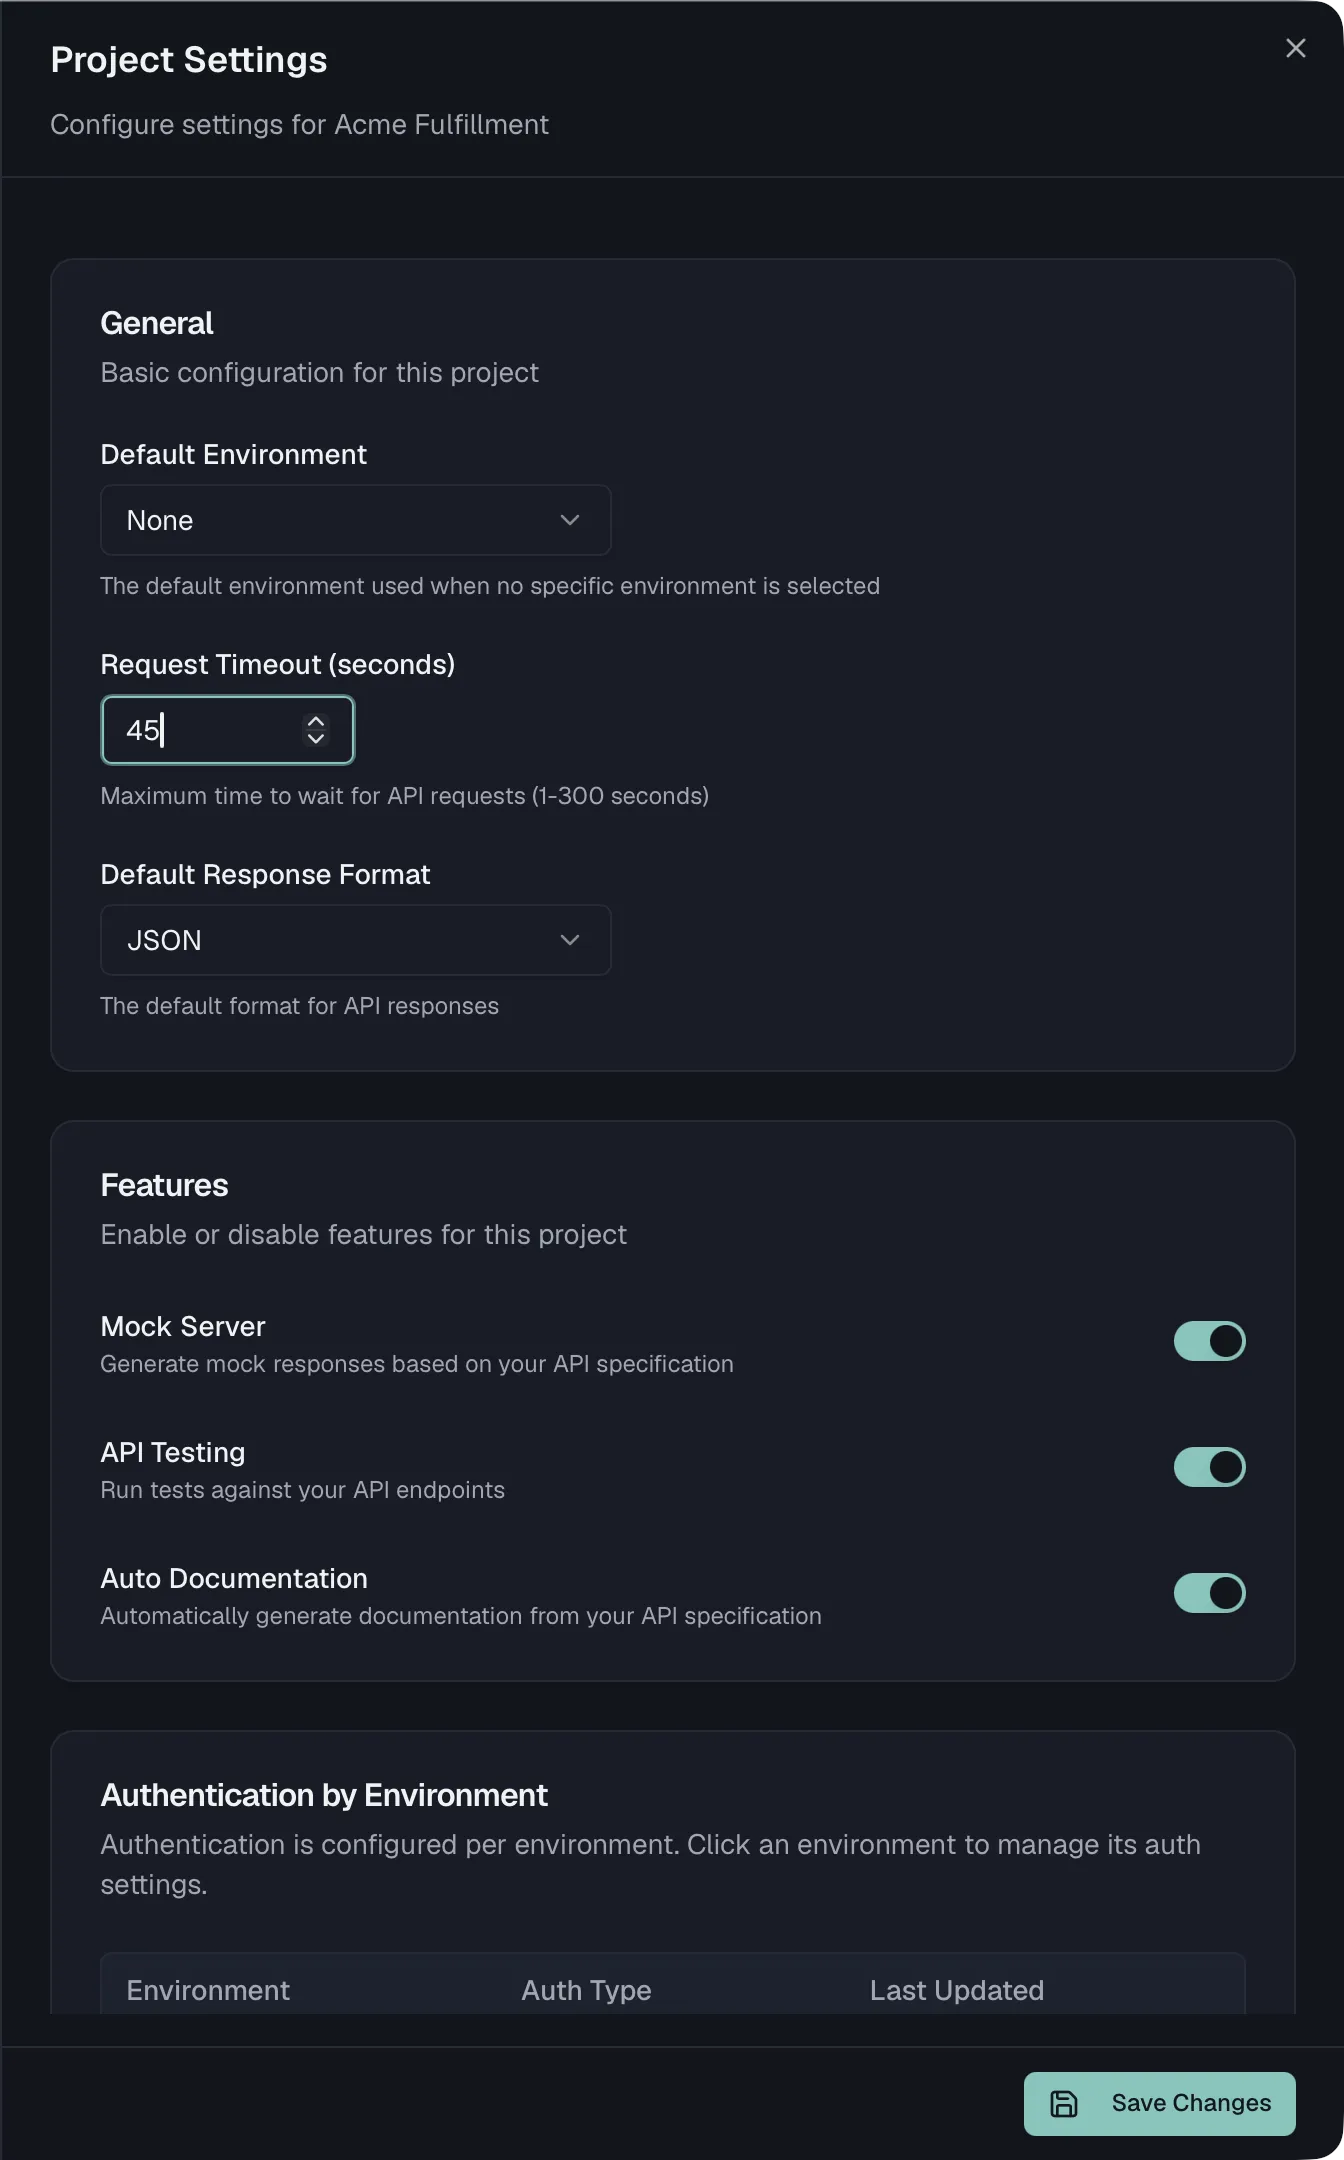
With a project selected, click Project Settings at the bottom of the project list. The settings sheet contains:
| Section | Settings |
|---|---|
| General | Default Environment (used when no specific environment is selected), Request Timeout (1 to 300 seconds), Default Response Format (JSON or XML). |
| Features | Toggles for Mock Server, API Testing, and Auto Documentation in this project. |
| Authentication by Environment | Overview of the auth configuration per environment. See Project Auth. |
| Webhooks | Receive notifications when test runs complete. See Webhooks. |
| API Style Guide | Override style guide rule severities for this project. See Style Guide. |
| Header Policies | Project-level header policies, with organization-wide policies inherited and read-only. See Header Policies. |
| Danger Zone | Delete the project. |
Changes are saved with the Save Changes button that appears once you edit a setting.
Switching projects
The project switcher sits in the header whenever you work inside a project. Click the project name, or press Ctrl+P or Cmd+P, to open it:
- Search projects by name or slug.
- Favorites holds the projects you star to pin them to the top.
- Recently used keeps your last five projects.
- All Projects lists everything else.
- New Project jumps straight to project creation.
Switching keeps you on the current page where it makes sense. If you switch projects while in the API Designer, the test runner or the mock server, you stay in that tool with the new project's data.
Members and access
Project access is governed by your organization's roles and, optionally, team assignments:
- Members can view projects (projects:read) and work on specs and tests, but cannot create, edit, or delete projects.
- Admins and Owners can create and edit projects (projects:write) and delete them (projects:delete).
- With Team Access (Starter and above), teams can be assigned to specific projects with a Read or Write role, restricting what non-admin members can touch. See Team Access.
Plan limits
Project and spec counts are gated by your plan:
| Plan | Projects | Specs per project |
|---|---|---|
| Free | 2 | 3 |
| Starter | 10 | 10 |
| Pro / Enterprise | Unlimited | Unlimited |
When you approach a limit, an upgrade nudge appears above the project list. At the limit, creating a project opens an upgrade dialog instead. Projects that exceed your plan's limit, for example after a trial ends, become read-only and are marked with a lock icon until you upgrade. See Billing.
Related
- Environments — development, staging, production and more per project
- Variables — configuration values across org, project, and personal scopes
- Project Auth — authentication configuration per environment
- Team Access — restrict projects to specific teams
- Billing — plans and limits