

Publishing the Portal
Publishing has two layers. First a documentation version goes live inside Routebase, moving from Draft to Review to Published. Then the portal build turns that version into a static site your readers can reach. This guide covers taking a version live and everything around it, which means enabling the portal, controlling visibility, deploying and sharing.
The forward path runs from the Publish button in the documentation header, and it moves a version through review, publishes it, and deploys it to the portal. The guided publish flow below describes it. Everything else lives in Documentation Settings → Public Portal, which covers the portal address, portal features, retracting a version and taking the portal offline.
Those settings are split across five tabs, and it is worth knowing which is which before hunting for a card:
| Tab | What lives there |
|---|---|
| Publish | Portal Status, Portal Subdomain, Custom Domain, Publication (retract / unpublish), Deployed Versions, Build History |
| Appearance | Theming through the theme editor, and Custom CSS. See Branding. |
| Features | The reader-facing feature toggles and the Page actions menu |
| Advanced | SEO and custom head/body scripts |
| Insights | Agent Readiness, Portal Analytics and the Feedback Dashboard |
Every tab except Publish stays hidden until the portal is enabled, showing "The portal is disabled. Enable it in the Publish panel to configure these settings." instead. One Save Changes button at the top of the page saves all of them together, and an amber hint appears while anything is unsaved.

Enabling the portal
On the Publish tab, the Portal Status card has a Portal Enabled switch. It is described as "When enabled, your documentation is publicly accessible." Once enabled and published, the card shows your portal URL with an open-in-new-tab link and a copy button. It also shows the last build status as Completed, Failed or In Progress, with its page count and date.
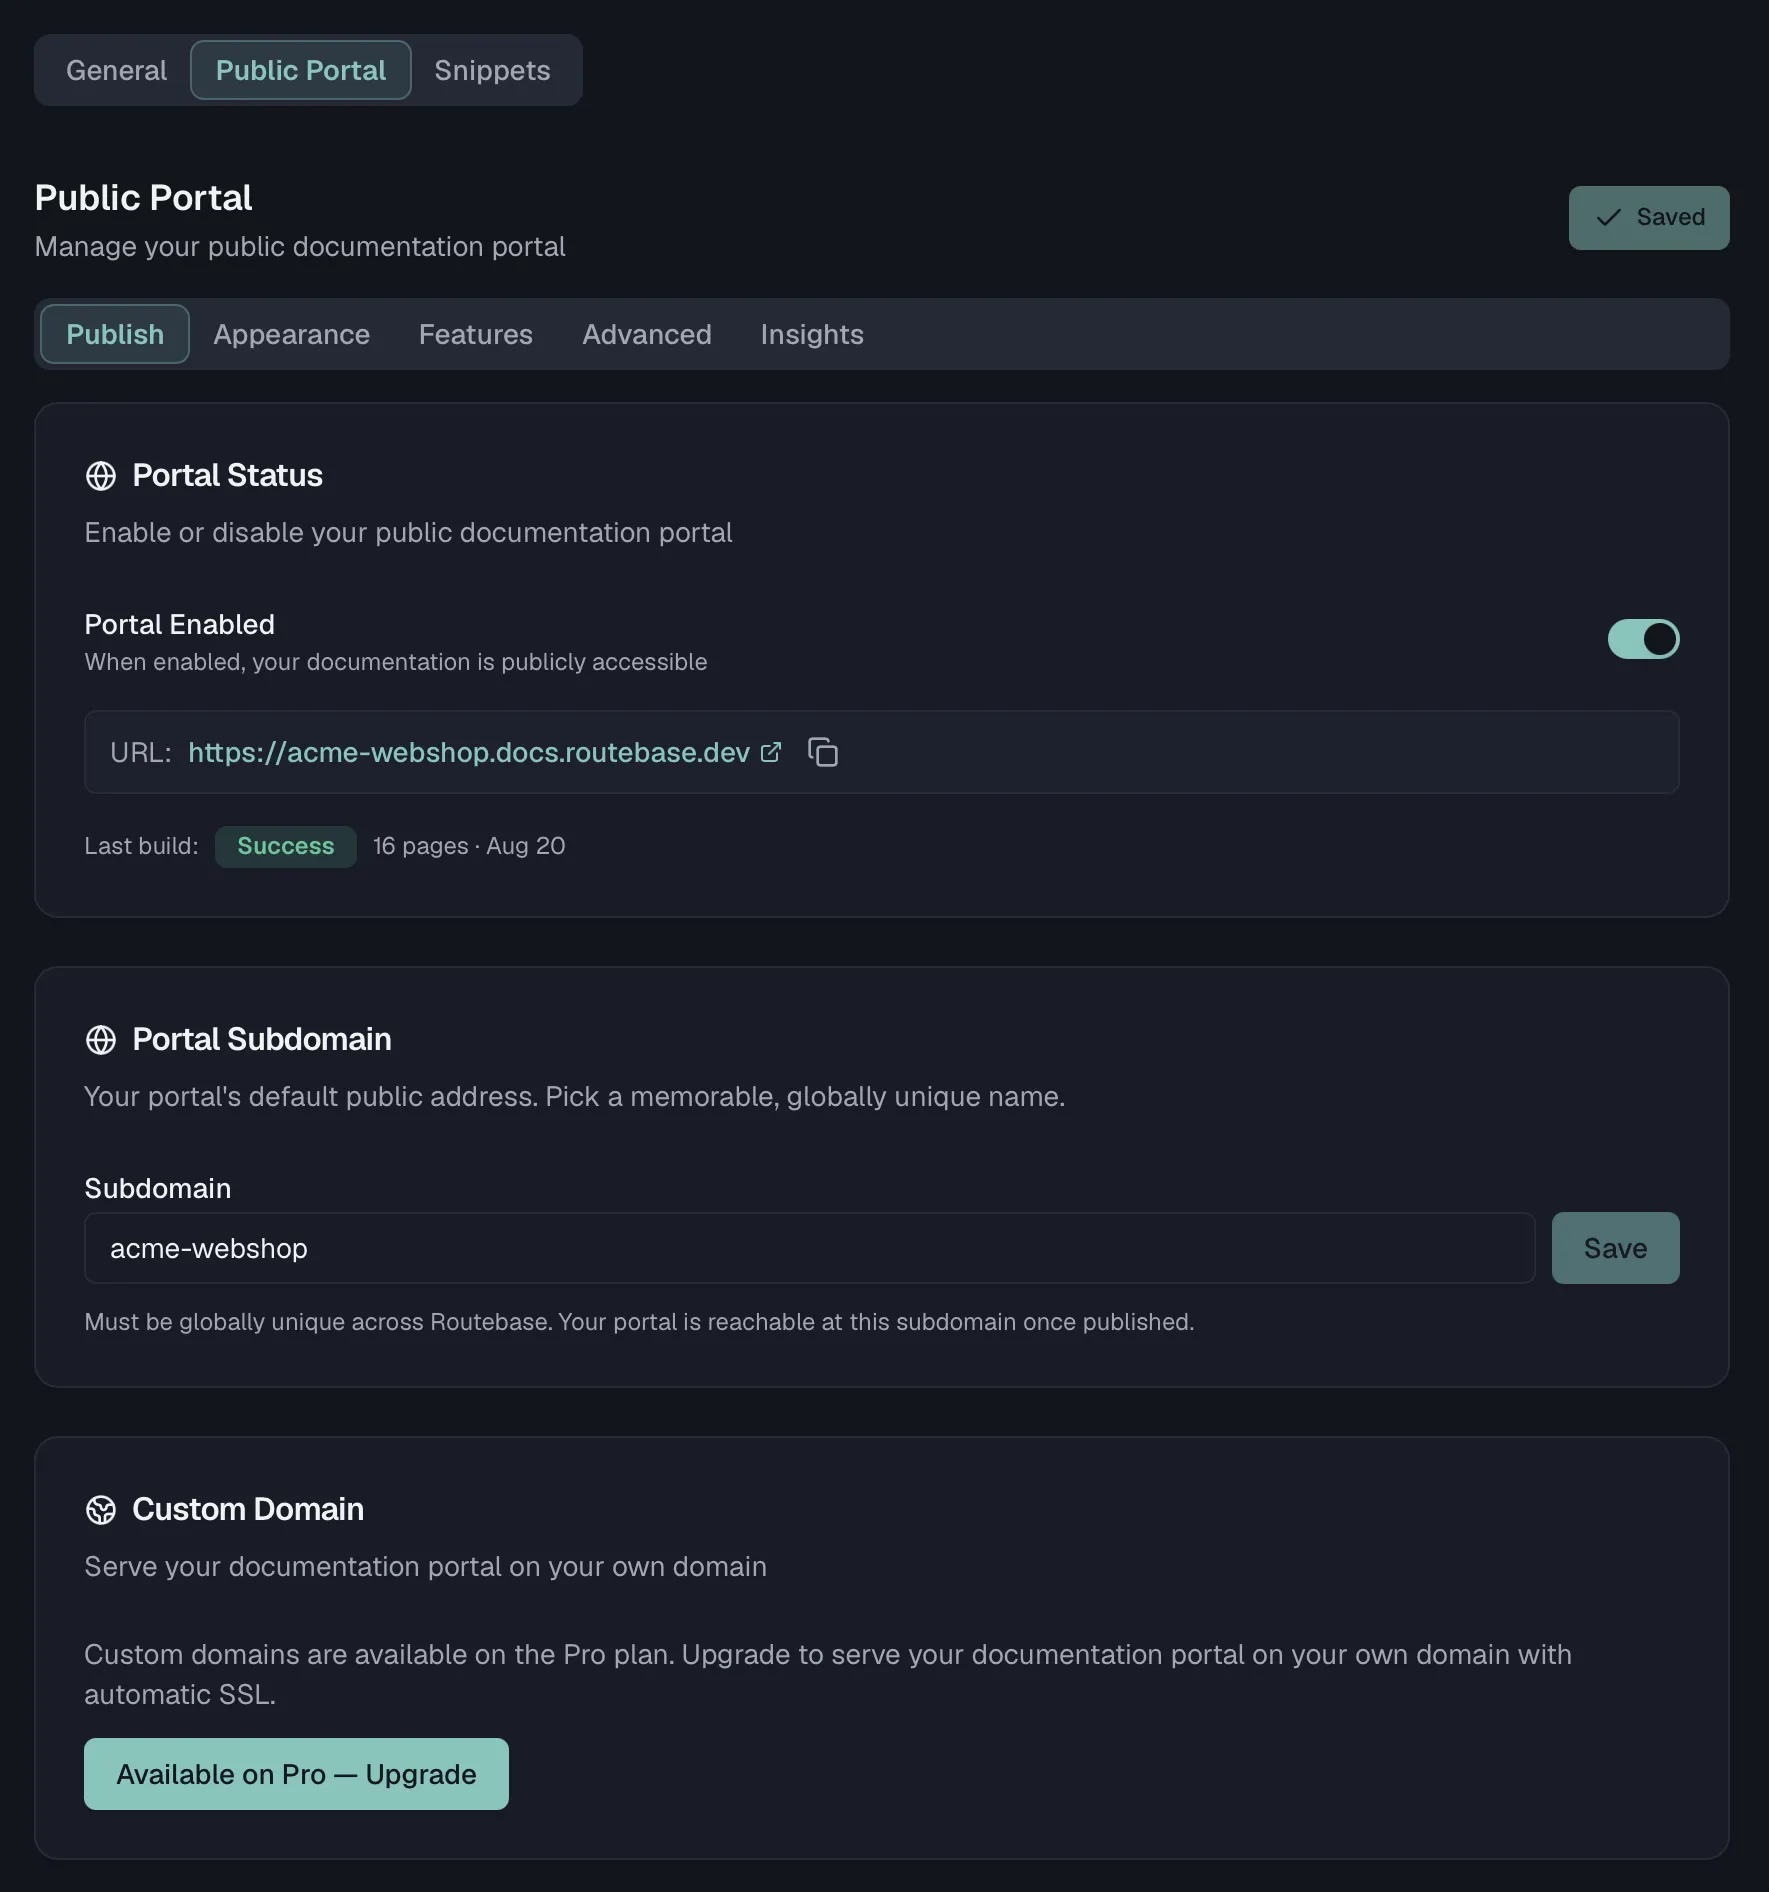
If the portal is built but has no public address yet, the card tells you to set a portal subdomain or connect a custom domain first.
Portal subdomain
The Portal Subdomain card, also on Publish, sets your portal's default public address:
- The allowed characters are lowercase letters, numbers and single hyphens, in a name of 3 to 63 characters.
- The name must be globally unique across Routebase.
- Saving the subdomain requires the docs:manage-portal permission, which Admins and Owners have.
Once saved and published, your portal is reachable at that subdomain, and the resulting URL appears in the Portal Status card.
You can also serve the portal on a domain you own. The Custom Domain card directly below the subdomain walks you through DNS records, verification and SSL, then monitors DNS and SSL health once the domain is active. Custom domains are a Pro and Enterprise feature, and Custom Domains covers the full setup.
Version visibility
Only published versions that are marked Public can be built for the portal:
- Internal keeps the version visible to your team inside Routebase only.
- Public allows the version to be deployed to the public portal.
Making a version public is part of the guided publish flow's Deploy to portal step. Retracting a public version is the reverse, and it lives in the Publication card on Public Portal → Publish. Pick a published version and click Make Internal, which requires docs:manage-portal and removes the version from the portal. The confirmation warns "Visitors will no longer be able to access this version. You can make it public again at any time."
Previewing before you publish
The eye icon in the documentation header generates a real portal preview of the current version and opens it in a new tab, so you can sign off on content before publishing. If a fresh preview already exists it opens straight away, under the tooltip "Open portal preview". Otherwise clicking it renders one and shows the progress in a popover, under the tooltip "Generate portal preview". The preview trigger requires the docs:manage-portal permission.
The guided publish flow
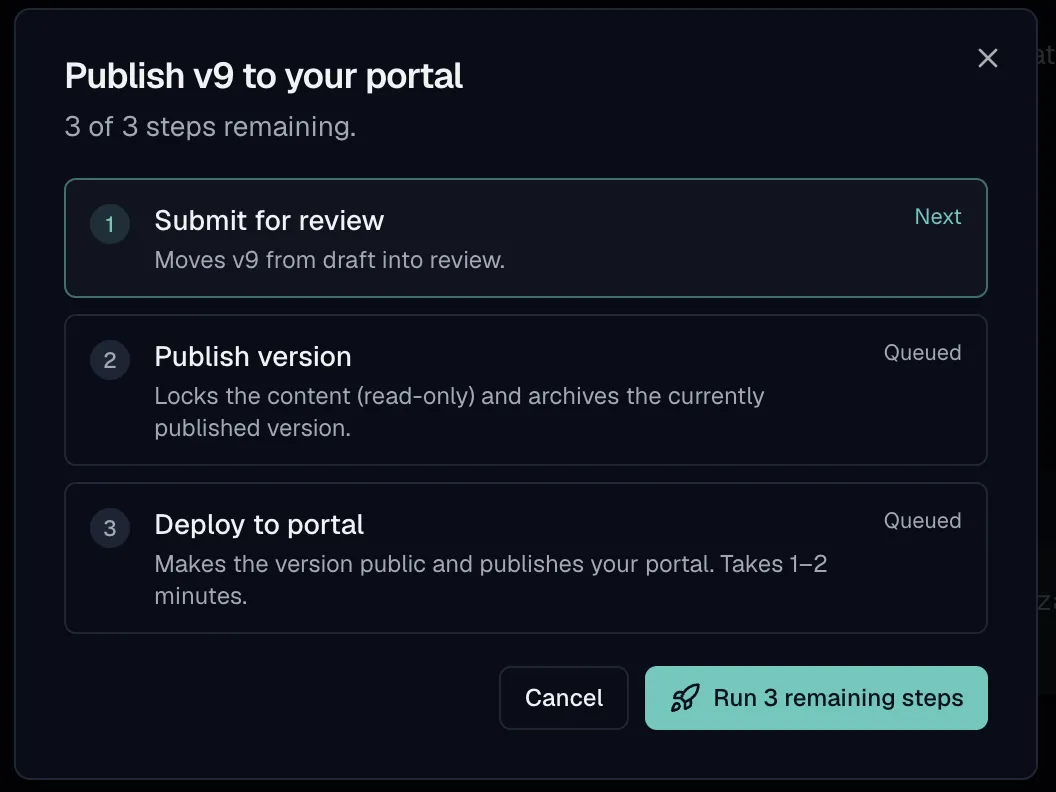
The Publish button in the documentation header opens a guided dialog titled "Publish v{N} to your portal", which walks the version through the whole pipeline in one place. A small pulsing dot on the button tells you at a glance whether the live portal is behind your latest edits. Its tooltip reads "Edited since last deploy", "Not deployed yet" or "Up to date".
The dialog lists the remaining steps as rows and runs the permitted ones in order when you click the action button:
| Stage | What it does |
|---|---|
| Submit for review | Moves the version from draft into review. |
| Publish version / Approve and publish | Locks the content (read-only) and archives the currently published version. The row is labelled Approve and publish when an approval workflow is required. |
| Deploy to portal | Makes the version public and publishes your portal, enabling the portal first if needed. It takes one to two minutes. |
Steps you lack permission for are shown but skipped, with a note saying why. Deploying needs the portal-management permission, for instance, and publishing needs the publisher permission. When an approval workflow applies, the dialog names the designated approvers. Once everything is live the dialog says "Everything is live and up to date." and offers an Open portal button.
Deployed versions
Multiple versions can be live on the portal at once, such as v1 and v2 of your API docs. The Deployed Versions card lists each deployed version with its deploy date and page count:
- Default marks the version readers land on. Use Set Default to switch.
- Undeploy removes a version from the portal. The last remaining default version cannot be undeployed.
Whether readers can switch between deployed versions is controlled by the Version History feature toggle described below. It carries a "Versions to show" limit, and older versions beyond that limit redirect to the current one.
Retracting and taking the portal offline
The Publication card on Public Portal → Publish handles the retract side. It describes itself as "Retract a published version, or take the whole portal offline." Alongside Make Internal above, its Unpublish button disables the public portal and removes all published files. The warning reads "Visitors will no longer be able to access your documentation. You can re-publish at any time."
Portal features
On the Features tab, the Features card toggles reader-facing functionality. Remember to click Save Changes at the top of the page afterwards.
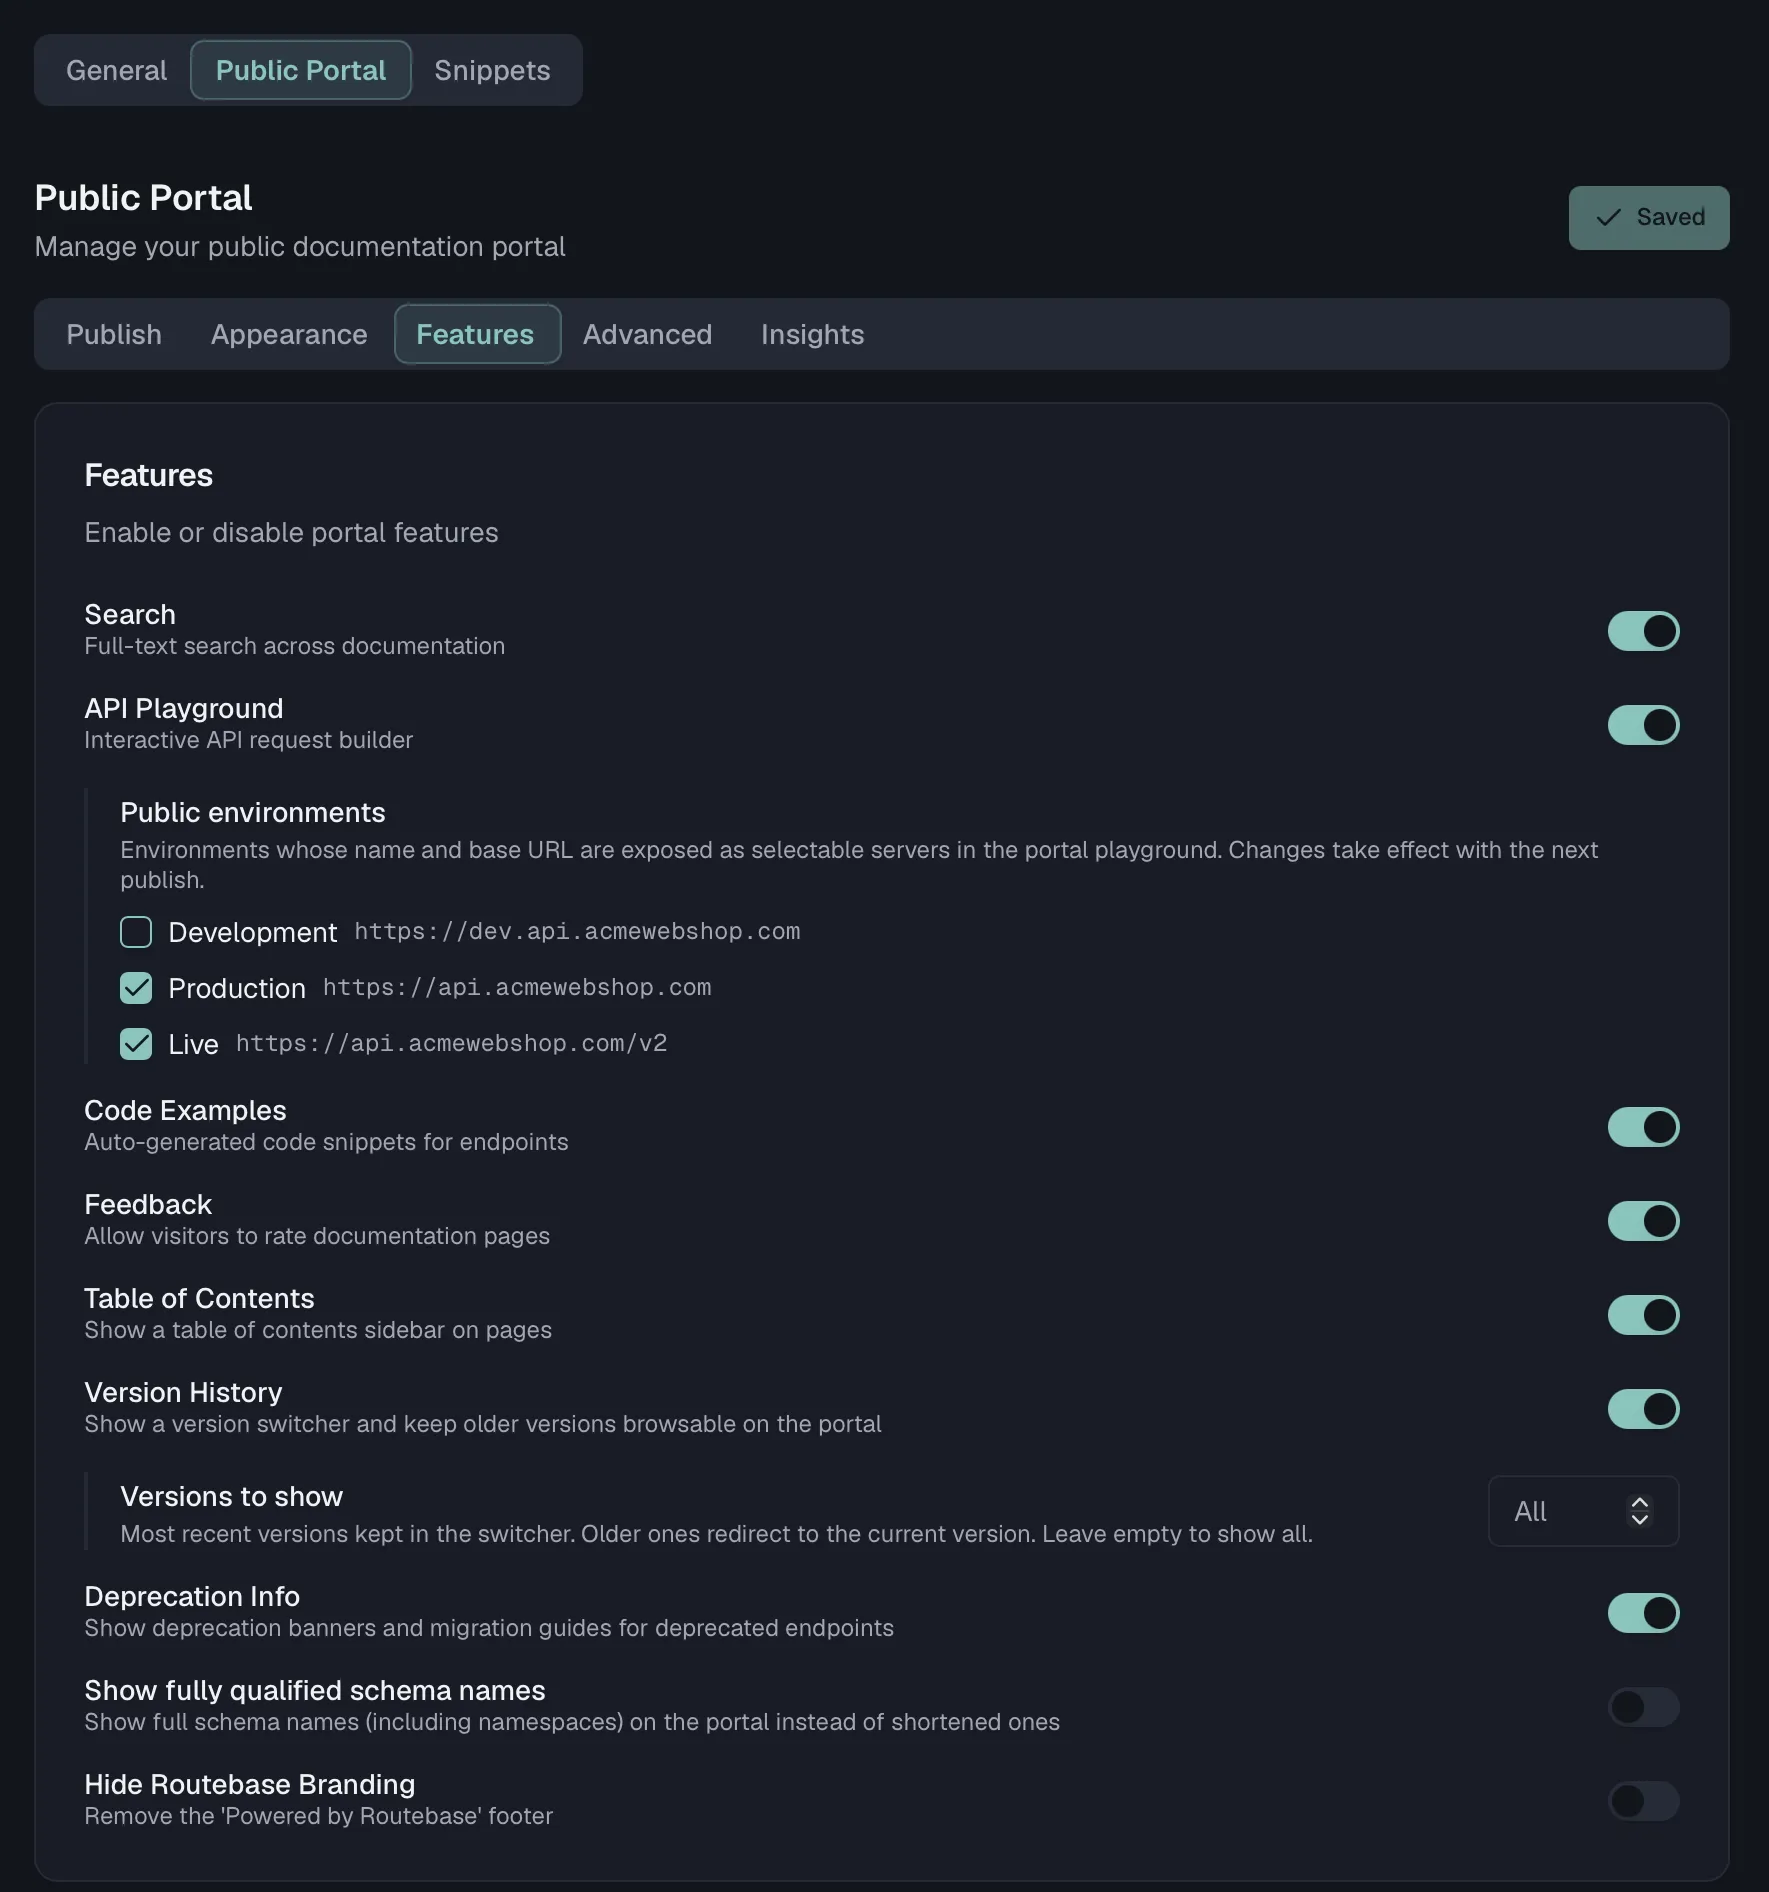
| Feature | Description |
|---|---|
| Search | Full-text search across documentation. |
| API Playground | Interactive API request builder. When on, you can pick which project environments are exposed as selectable servers in the playground, and only those with a base URL qualify. See Where the base URLs come from. |
| Code Examples | Auto-generated code snippets for endpoints. |
| Feedback | Allow visitors to rate documentation pages. |
| Table of Contents | Show a table of contents sidebar on pages. |
| Version History | Show a version switcher and keep older versions browsable on the portal. |
| Deprecation Info | Show deprecation banners and migration guides for deprecated endpoints. |
| Show fully qualified schema names | Show full schema names (including namespaces) on the portal instead of shortened ones. |
| Hide Routebase Branding | Removes the "Powered by Routebase" footer, and it requires the Pro plan. |
A separate Page actions card on the same tab chooses which entries appear in the portal's "Copy page" menu. The entries are Copy page as Markdown, Download OpenAPI spec, Open in ChatGPT and Open in Claude.
Which languages appear as tabs in the code examples is configured under Documentation Settings → General → Code Languages, which offers cURL, HTTPie, JavaScript, Python, C#, Go, Java, Ruby and PHP. The portal renders exactly the languages you select, or all of them if you select none. Changing the selection needs a new portal build to take effect.
Where the base URLs come from
The host your readers see in the code samples, and pick from in the playground's server dropdown, is resolved once at publish time, in this order:
- The environments you opted in. With the API Playground on, the environments you ticked under the toggle are exposed, in the order you selected them. Only their name and base URL ever leave Routebase, never their variables or auth configuration. An environment that was deleted, or that has no base URL, drops out silently.
- The environment that feeds the public docs. With no opt-in list, Routebase falls back to the project environment carrying the Feeds the public docs role, if it has a base URL. That role is docs-facing by definition, which is what makes it a safe default.
- The spec's own
servers[]. If neither applies, the samples use the servers declared in the OpenAPI document.
Where a spec declares a base path, it is appended to the environment URL, unless the URL already ends in that path, so https://api.example.com/v3 does not become …/v3/v3.
Two consequences are worth planning around. The server dropdown lives inside the playground widget, so with the API Playground switched off there is no switcher at all and the code samples silently take the first entry of the resolved list. And if nothing resolves at all, meaning no opted-in environment, no docs-source environment and no servers[] in the spec, the samples render a literal {baseUrl} placeholder instead of a host.
Docs your readers' agents can read
Every portal build emits three machine-readable outputs alongside the HTML. They are not a feature you switch on, and a build that fails to produce them fails outright.
| Path | What it is |
|---|---|
/llms.txt |
An index of the portal in the llms.txt convention. It carries the site title, the meta description as a blockquote, then two lists. Docs holds every content page with a link and a one-line description derived from its own text, while API Reference holds every generated endpoint, folder and spec page in navigation order. |
/llms-full.txt |
The entire portal as one Markdown document, with every content page in reading order, snippets resolved, separated by rules. It suits an agent that would otherwise crawl page by page. |
{slug}/index.md |
A Markdown twin of every page, served next to its HTML. Content pages emit the Markdown you wrote. API reference pages get generated Markdown for the endpoint, covering path, method, parameters, and request and response bodies with $refs resolved, so an endpoint page is readable as text too. Stacked folder and single-page references emit the concatenation of everything they show. |
Image paths in llms-full.txt and in the .md twins are rewritten to absolute URLs, because those files get read far away from the page they belong to.
robots.txt points at both the sitemap and /llms.txt, so an agent that starts at the root finds them without being told. The Copy page as Markdown page action on the Features tab is a convenience link to the .md twin for human readers, so switching it off removes the menu entry rather than the file.
Checking agent readiness
The Agent Readiness card on the Insights tab scores how well AI agents can find and read your published portal. The score follows the Agent-Friendly Docs Spec, an open specification, and Routebase measures it with afdocs, the spec's reference checker.
Running a check requires docs:manage-portal. Agents with docs:read can read the latest result over MCP.
- Open Documentation Settings → Public Portal → Insights.
- Click Run check. The card names the address it is checking, and the run takes a few minutes, so you can leave the page in the meantime.
- Read the result once the score appears. The card shows the overall score out of 100 with its grade, the score of each category and every check that did not pass.
The check reads the portal at its public address, the same way an agent does, and samples up to 50 of its pages. Only a portal with a deployed default version and a public address can be checked. Each portal can be checked five times per day, and the card shows how many checks are left today. If a run does not finish, the card says why and keeps the previous result.
Reading the result
Every check that did not pass appears in one of two groups:
| Group | What it means |
|---|---|
| Fix in your content or settings | The check depends on what you publish, and the card says what to change. |
| Handled by Routebase | The portal build produces what the check reads. Publishing the portal again regenerates those files. |
The checks your content or settings decide are these:
| Check | What to change |
|---|---|
llms-txt-valid |
Set a Meta Description in the SEO card on the Advanced tab and publish again. It becomes the summary line of /llms.txt, and Open SEO settings on the card takes you to the field. |
page-size-markdown, page-size-html |
Split long guides into several pages, and group large API specifications by tags so each tag gets its own page. |
markdown-content-parity |
Write content that exists only as raw HTML or an embed as text, so the Markdown twin of the page carries it too. |
auth-gate-detection, auth-alternative-access |
Publish the versions agents should read as Public. |
From an agent, manage_portal with the action check_agent_readiness starts a run, and get_portal_agent_readiness returns the latest result with the checks that did not pass.
SEO and custom scripts
On the Advanced tab:
- SEO sets the Site Title, the Meta Description and an OG Image URL for search engines and social previews. The OG image has to be an absolute
httporhttpsURL. - Custom Scripts injects Head Scripts and Body Scripts into the portal HTML, which suits analytics or chat widgets.
Portal look and feel (themes, colors, fonts, logo, custom CSS) is covered in Branding.
Build history, feedback, and analytics
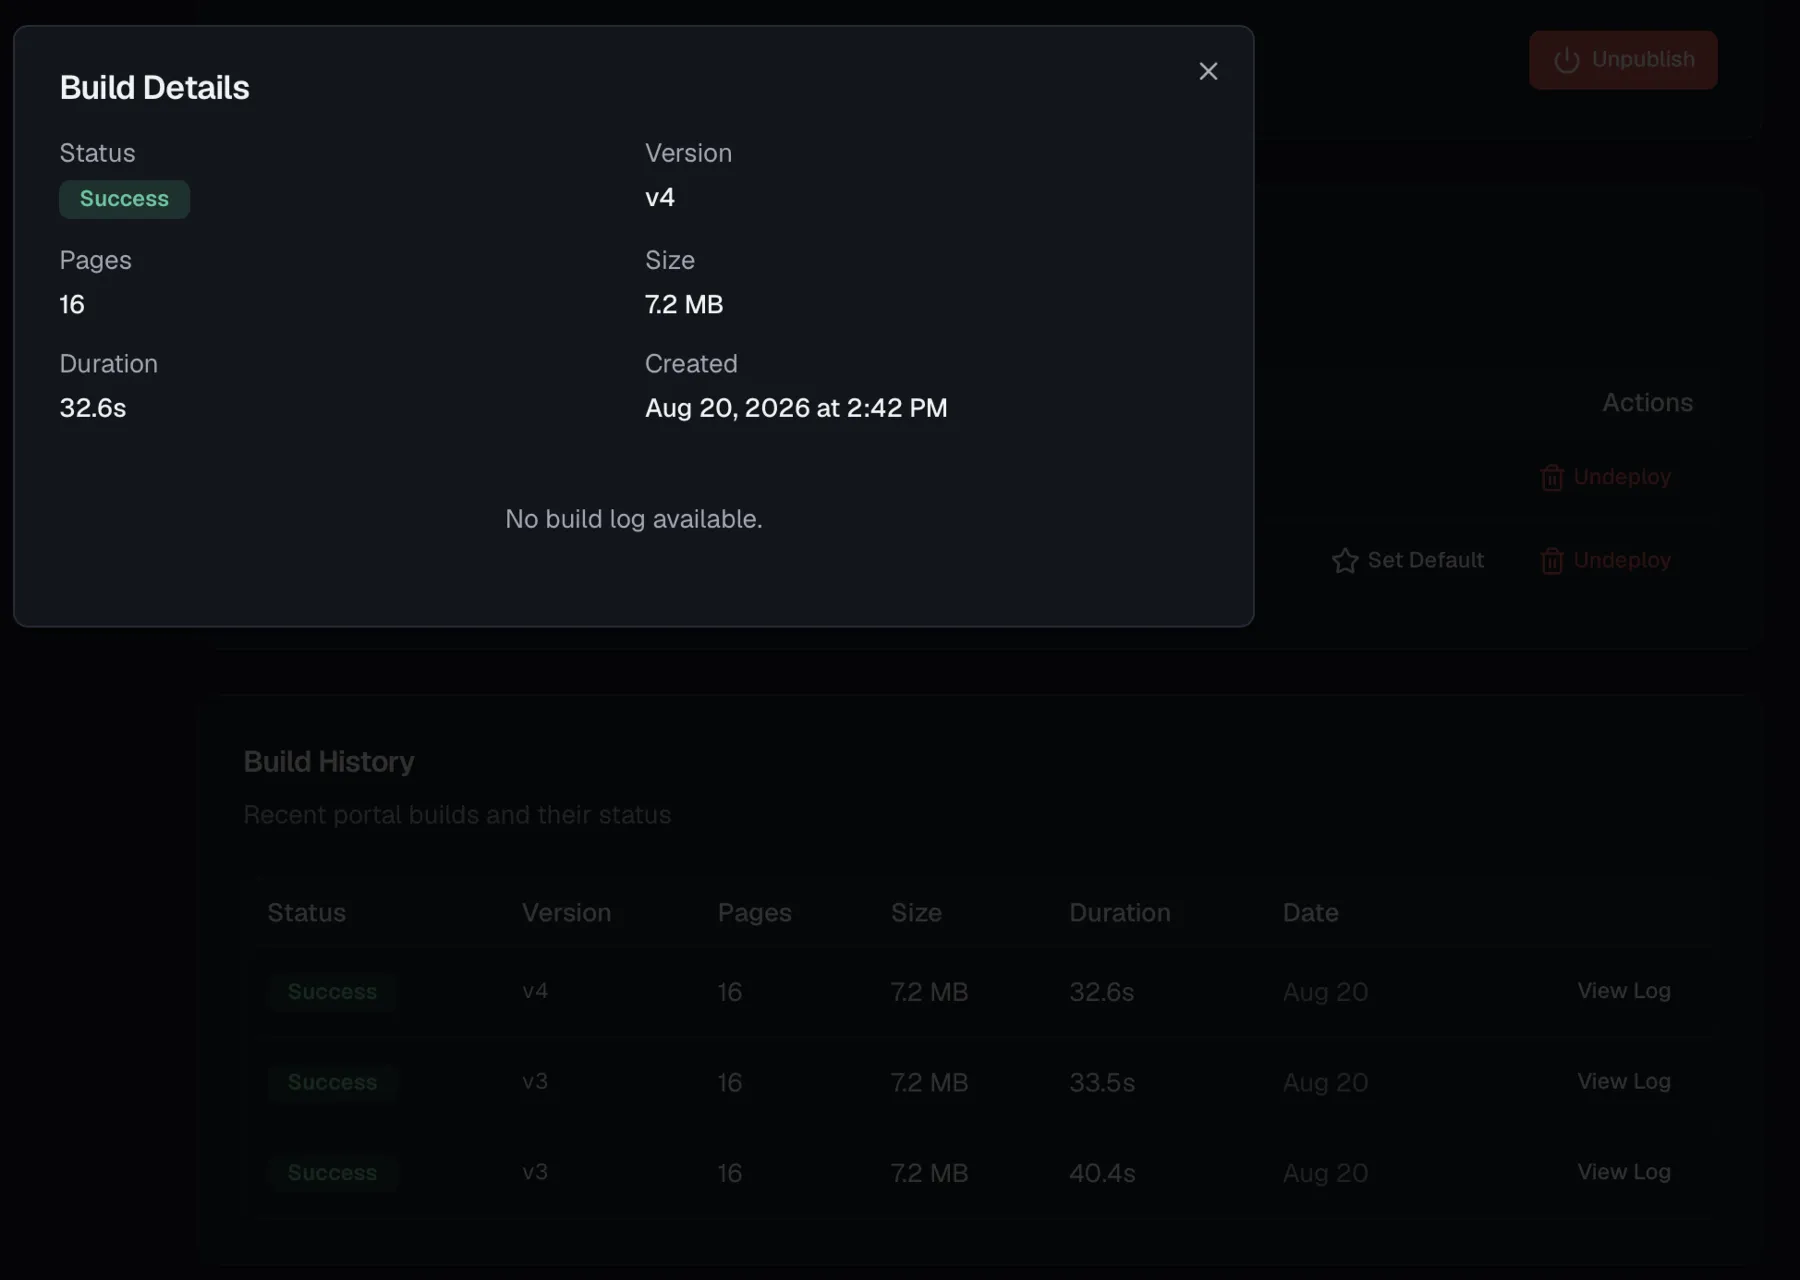
- Build History on the Publish tab lists every build with its status, version, page count, size, duration and date. The status reads Success, In Progress, Pending or Failed, and View Log opens the full build log and any error message.
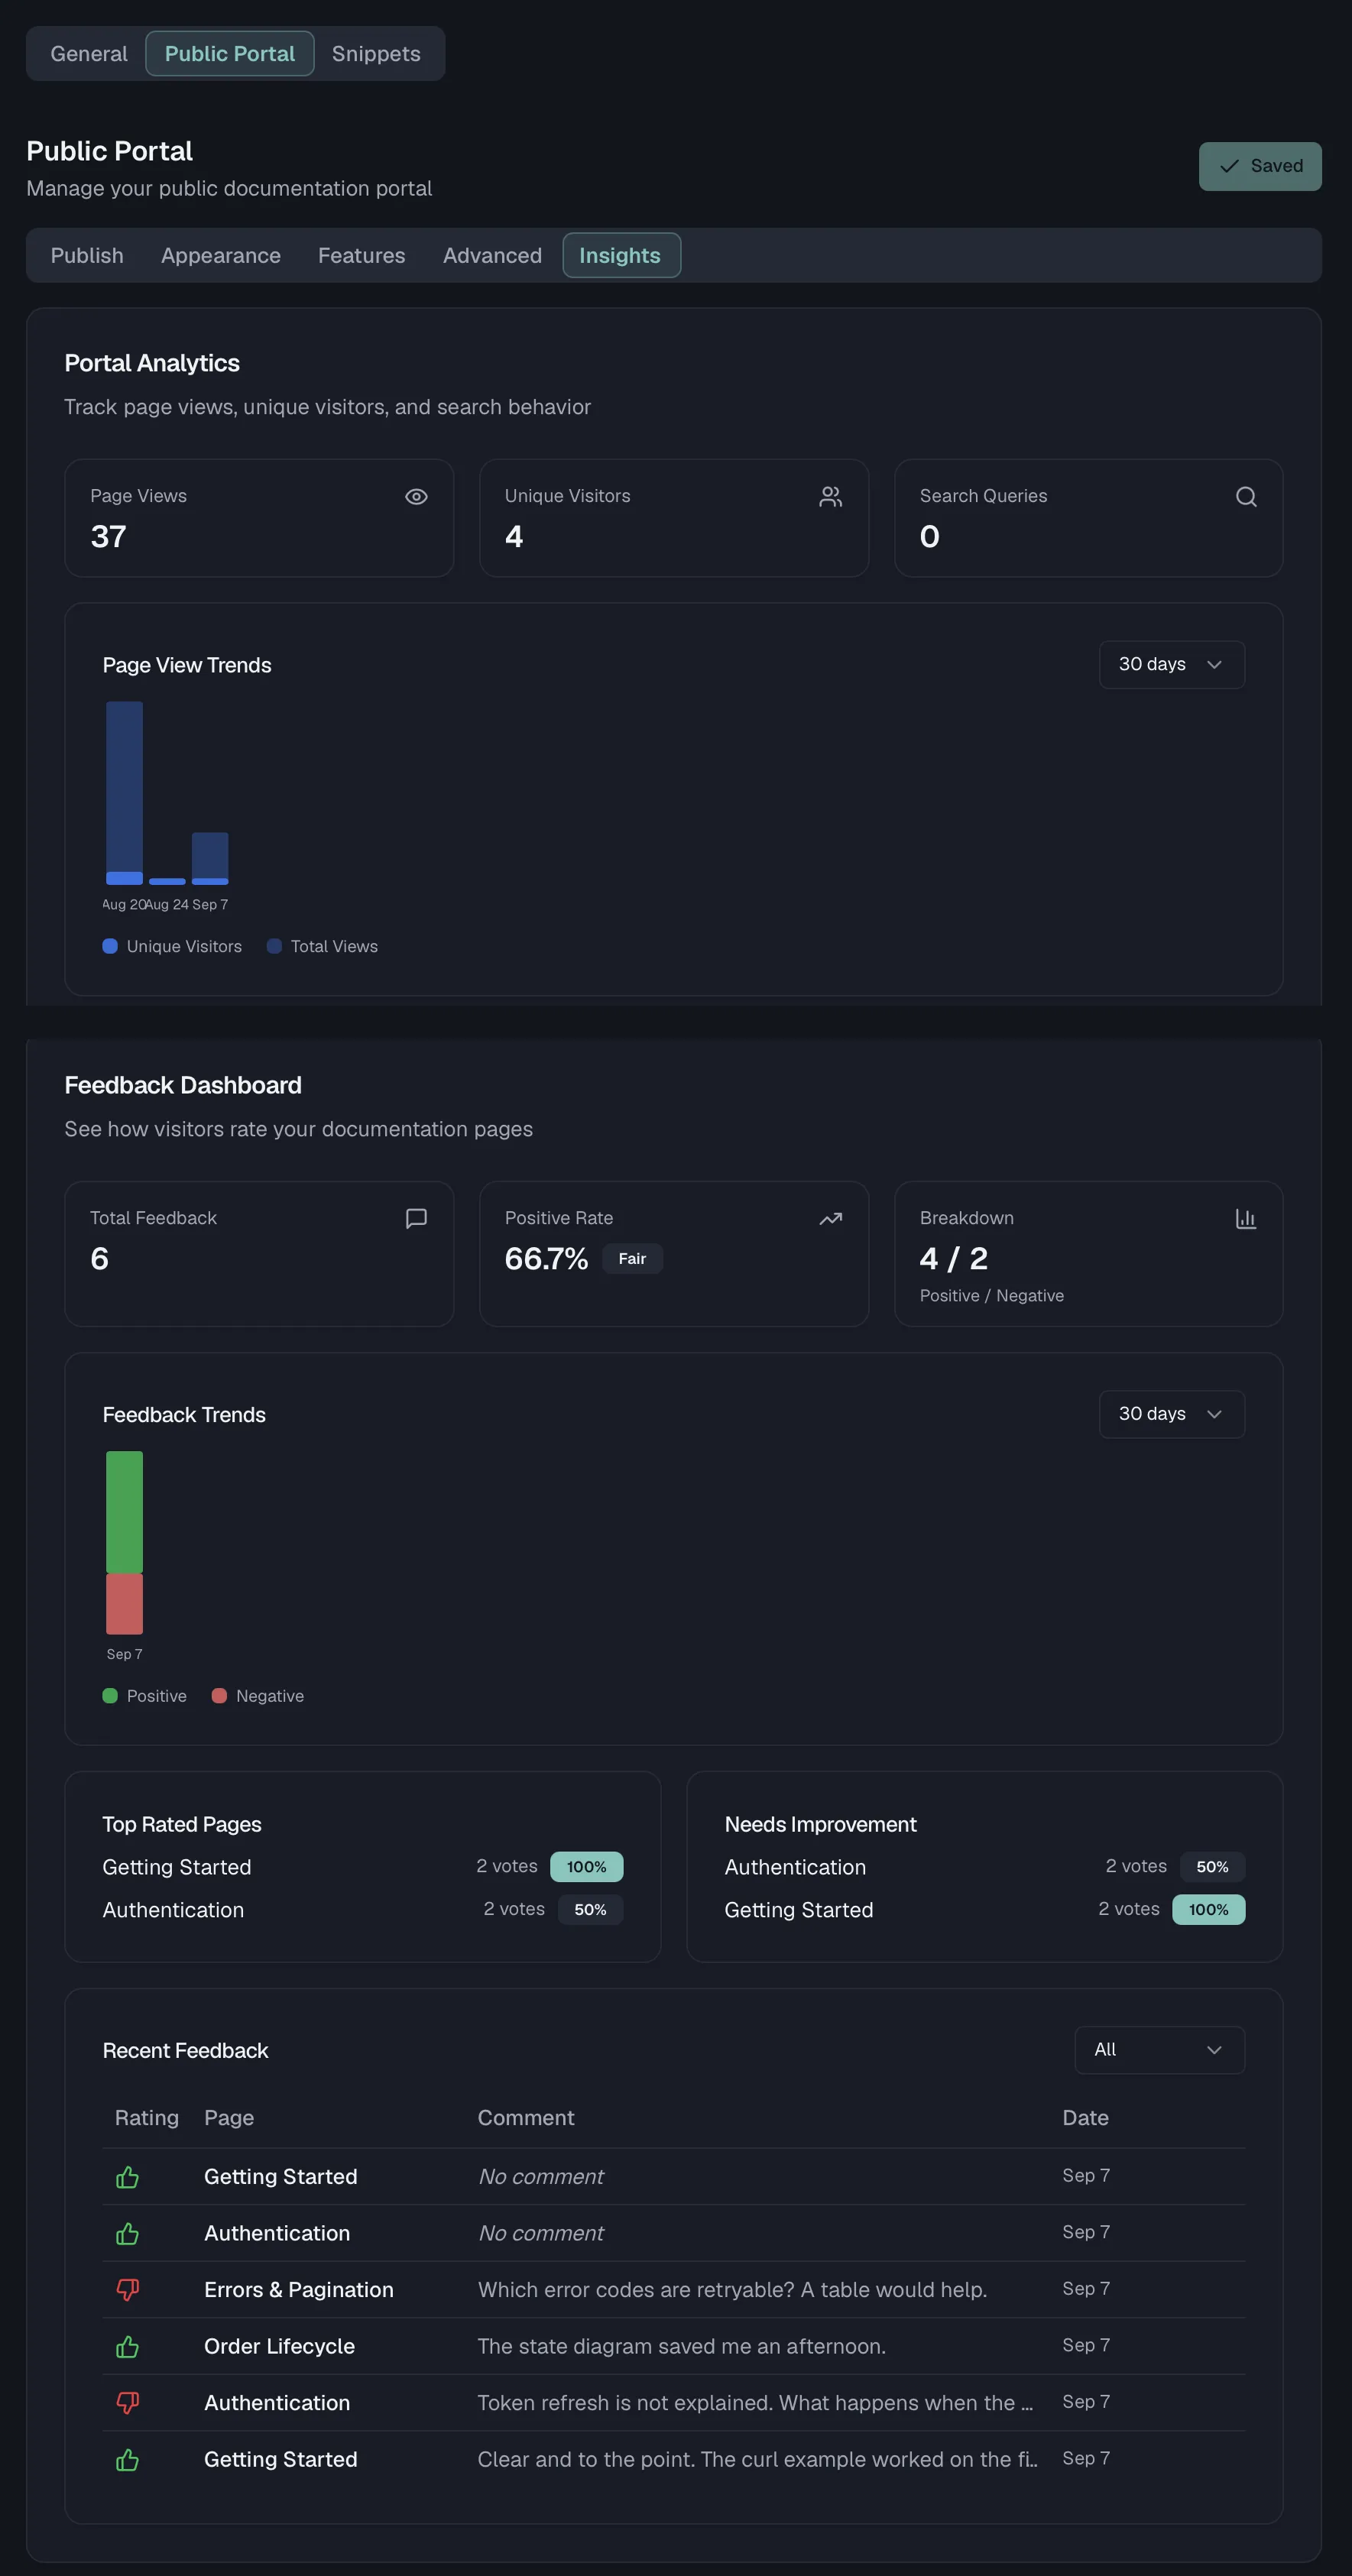
- Portal Analytics on the Insights tab shows page views, unique visitors, search queries, page view trends, top pages, top search terms, and Content Gaps, which are search terms that returned no results.
- Feedback Dashboard on the Insights tab appears when the Feedback feature is on. It shows total feedback, the positive rate, trends and recent comments from portal visitors. The toggle that switches feedback on stays with the other feature switches.
Publishing from an AI agent
The publish path is available over the Routebase MCP server as well, which is how you would wire documentation into a release script. The chain is three calls after set_context:
update_doc_page, orcreate_doc_page, writes the content into a mutable version, meaning Draft or In Review. It needsdocs:write.publish_doc_versiontakes a version in Review live, archiving the previously published one. It needsdocs:publish.trigger_portal_buildrenders and uploads the portal, and it returns the build status and its metrics. It needsdocs:manage-portal.
get_portal_url returns the public address and the custom-domain setup status, and the portal-admin toolset covers builds, deployments, analytics and feedback if you want an agent to watch the result. The full tool list is in Documentation Overview.
Publishing straight from the API Designer
When you publish an API spec version, the publish flow's success screen includes a Documentation panel, shown to users with docs:write. It tells you where the spec stands with a line like "This API is in documentation v2 (draft), pinned to v1.0.0", and it offers two actions:
- Update documentation to vX embeds or refreshes the spec snapshot in a mutable doc version, creating the portal or cloning the live version into a draft if needed. The docs stay a draft until you publish them.
- Publish documentation, shown with docs:publish, lets you choose Team only or Public visibility and take the documentation live in one step. Afterwards you get View Documentation and Copy Link buttons for sharing.
Related
- Versioning — the Draft → Review → Live lifecycle
- Branding — themes, logos, fonts, and custom CSS
- Documentation Overview — building the content that gets published
- MCP Quickstart — connecting an agent that can publish for you