

Documentation Overview
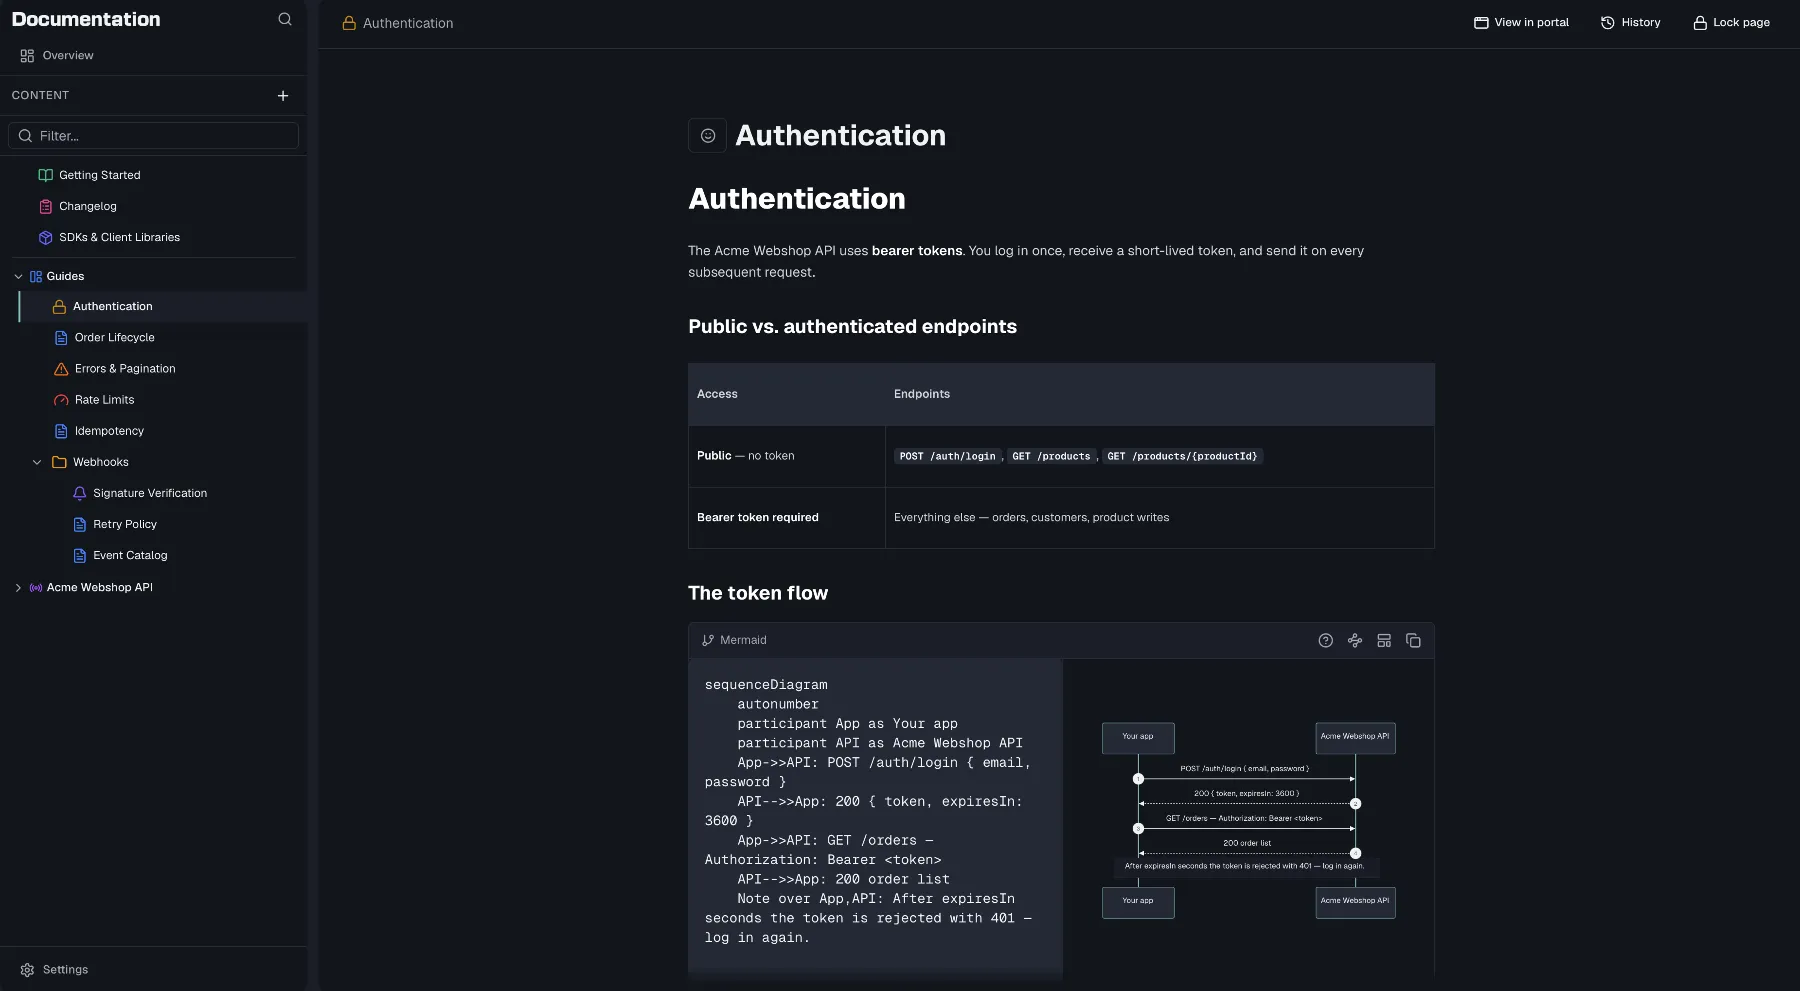
Routebase turns your API specs and hand-written guides into a versioned documentation portal. Each project has its own documentation workspace where you organize pages, folders, and API references in a single content tree, then publish the result as a hosted portal for your readers.
Open Documentation in the sidebar while a project is active. Viewing documentation requires the docs:read permission, and making changes requires docs:write. The built-in Member role includes both.
Your first visit
What happens the first time a project has no documentation depends on what you are allowed to do with it.
If you can complete the whole setup, Routebase opens a three-step assistant titled "Set up your documentation portal". Completing it means holding docs:write, docs:manage-portal and docs:publish, which Admins and Owners do.
- Under Content, give the portal a name and tick the API specs you want embedded as an API reference. Draft-only specs show Publish & add and are published on the way in, which needs specs:publish. A spec with no publishable version at all is shown disabled as No version. The step creates a Getting Started page from an editable template as the portal's entry page.
- Under Branding, save the portal address, which is the subdomain and is required to continue, then pick one of the built-in themes. Colors, fonts and logo are left for the theme editor later.
- Under Go Live, review a summary of name, address, theme and content, then click Publish portal. That makes version 1 public, enables the portal and starts the first build. You land on the live URL and can keep editing afterwards.
Skip setup — go to the editor at the bottom leaves the assistant at any point and drops you into an empty documentation workspace instead.
Members who can edit but not publish or configure the portal never see the assistant. For them a documentation workspace with an initial draft version is created silently, and the portal side is left to someone who can do it.
The version overview
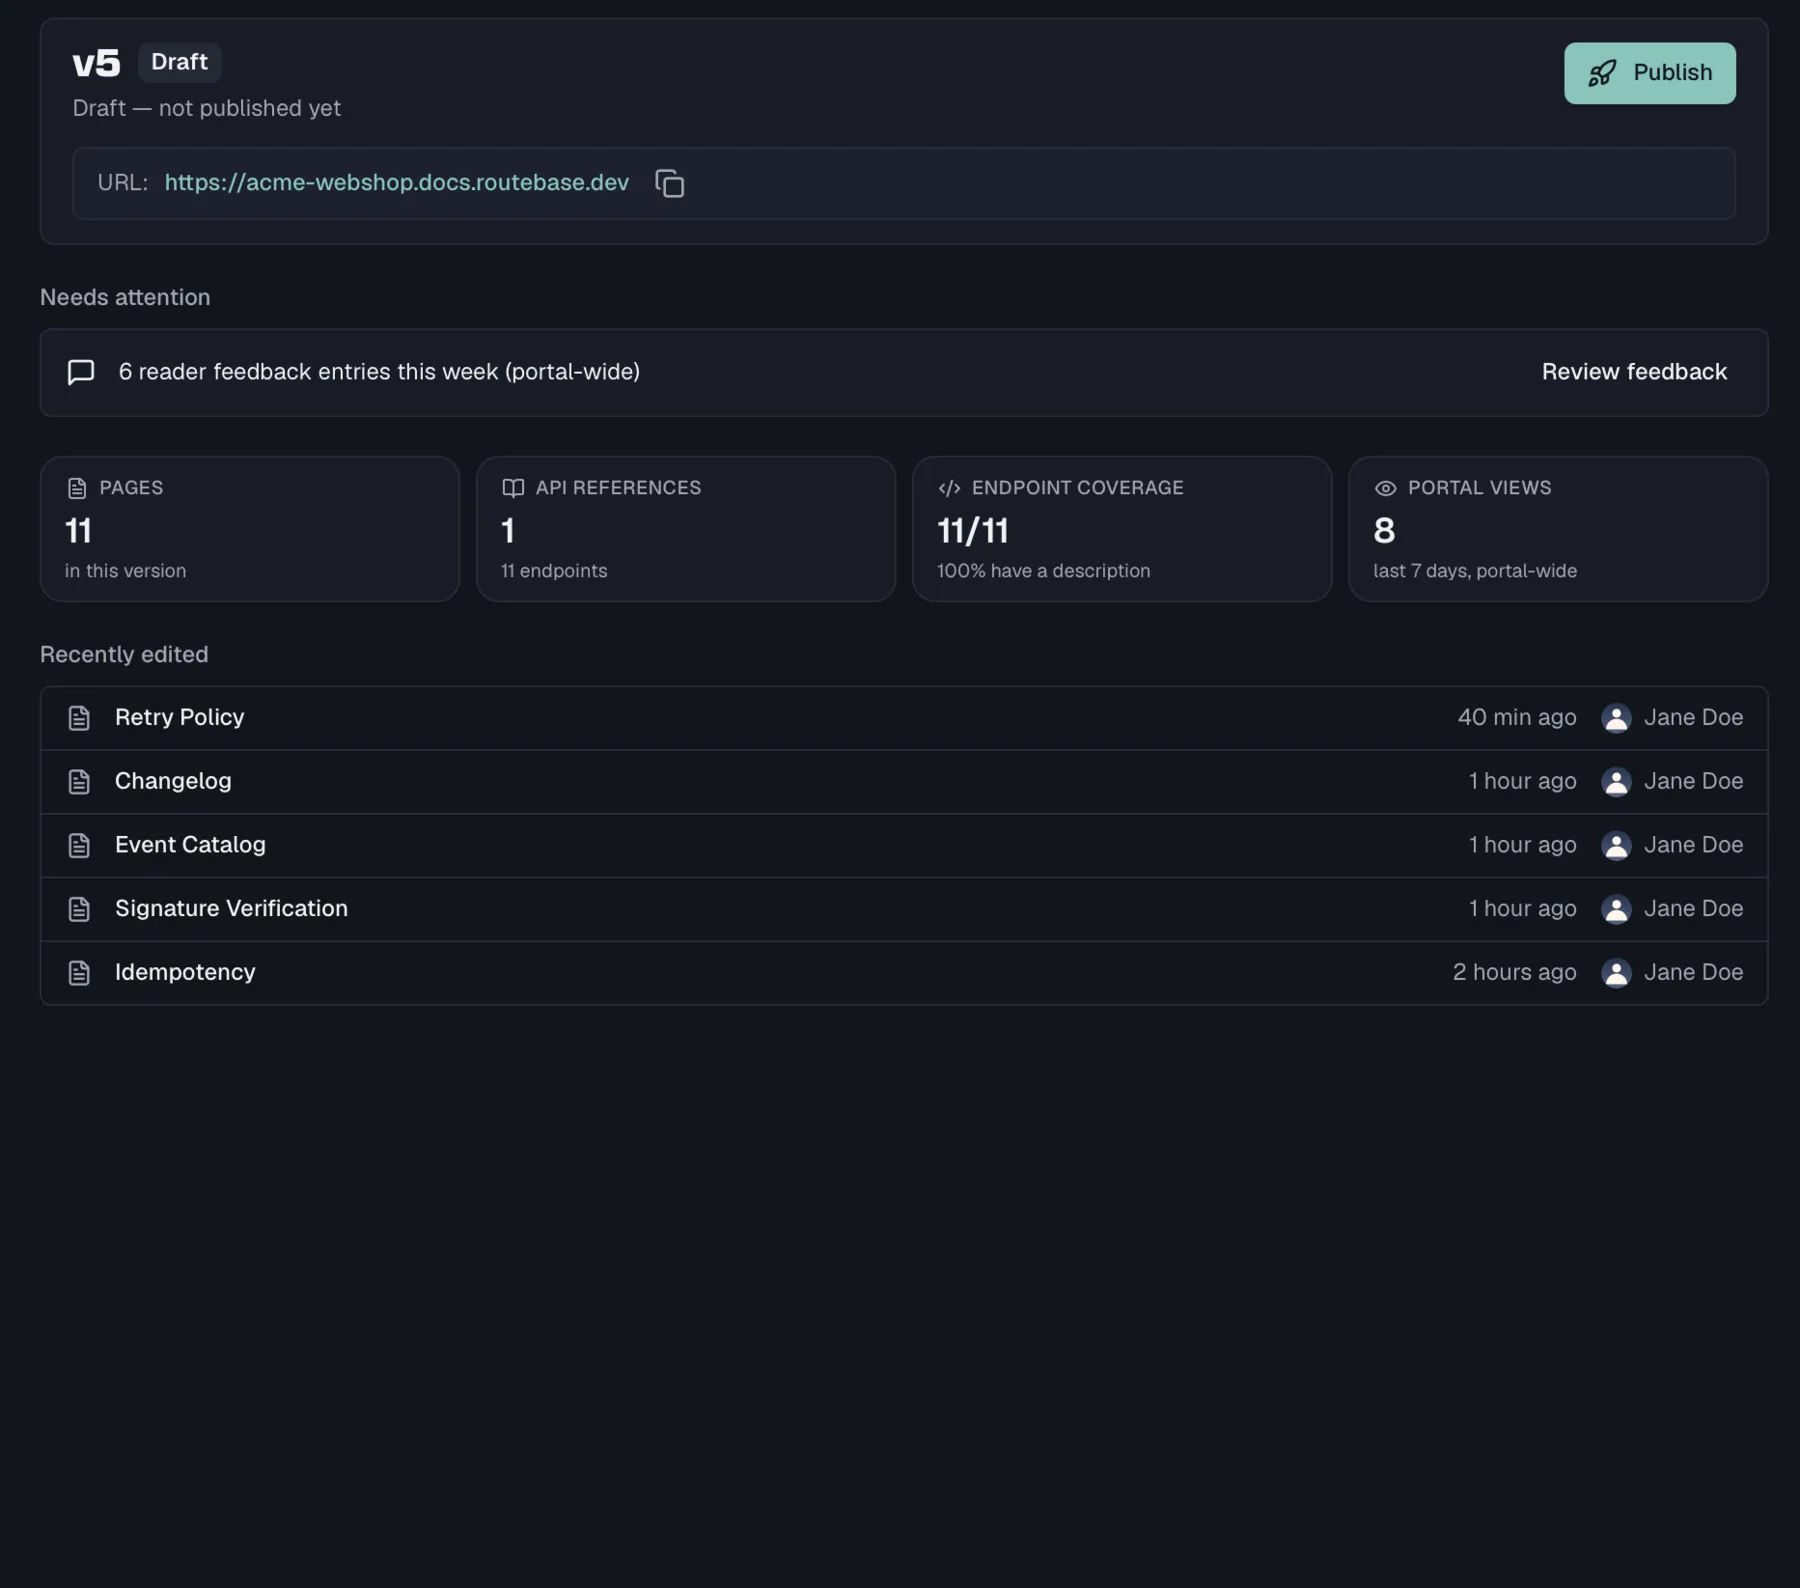
Opening Documentation lands on Overview, the first entry above the content tree, and so does every switch to another version. It answers where this version stands without a trip through the settings pages, and you can return to it at any time by clicking that entry.
Status header. The header carries the version number with its status badge, the last build as a colored dot reading Build succeeded / failed / building / queued, and one line of context. That line reads Published 3 days ago, Draft — not published yet, In review — waiting for approval or Archived — read-only. When the portal is enabled, its public URL sits below with a copy button. The action on the right follows the version, so an editable version offers Publish while a read-only one offers Open portal and Clone to new version.
Needs attention lists only what is actually pending, and each entry carries the action that resolves it:
| Entry | When it appears | Action |
|---|---|---|
| "<Spec> has a newer published version (vN)" | An embedded API reference is behind its spec — one entry per affected reference, only on an editable version | Review update opens that reference |
| "The last portal build for this version failed" | The newest build of this version failed | View build log |
| "N reader feedback entries this week (portal-wide)" | Readers left feedback in the last 7 days | Review feedback |
Dismissing a spec-update banner in the reference view also removes it here. When nothing is pending, the whole block collapses to a single line reading "Everything is up to date."
Stats count Pages and API references in this version, plus Endpoint coverage. Coverage says how many embedded endpoints carry a description, shown as 12/40 with the percentage below. Portal views covers the last 7 days portal-wide and appears only for readers with docs:manage-portal. Everyone else sees three tiles instead of four, and no request is made for data they may not see.
Recently edited lists the pages that moved last, each with the person who touched it and when. Clicking a row opens that page.
A version with no content at all shows entry cards instead, which are Add a page, Add an API reference and Start from template. The last one seeds a Getting Started page. On a read-only version the cards are replaced by the note that it must be cloned before it can be edited.
How documentation is structured
| Concept | What it is |
|---|---|
| Documentation | The container for all docs of a project. It holds versions and the portal configuration. |
| Version | An independent snapshot of the whole content tree (v1, v2, …). Drafts are editable; live versions are read-only. See Versioning. |
| Page | A single document — either a free-form custom page or a specialized page type (Getting Started, Authentication, …). |
| Folder | Groups pages in the tree. Root-level folders can be promoted to sections, which become top-level navigation tabs. |
| API Reference | An embedded snapshot of a published API specification, rendered as endpoint reference pages. |
The content tree
The left sidebar shows the content tree for the selected version. At the top of the tree:
- The Content header carries a + menu with New Page, New Folder, Add API Spec and New Section.
- A Filter... box narrows the tree by page title, folder name, spec name, or endpoint path and method. Press Escape to clear it.
The sidebar header has a Search (⌘K) button, and a Settings button pinned at the foot of the sidebar opens Documentation Settings. Generating a portal preview and publishing are handled from the documentation header at the top of the page, which Publishing covers.
Items without a section render under two group labels, Pages and API Specifications. When the tree is empty you see "No content yet — Start building your documentation." with a New Page button.
Organizing the tree
- Drag and drop items to reorder them or move them into folders.
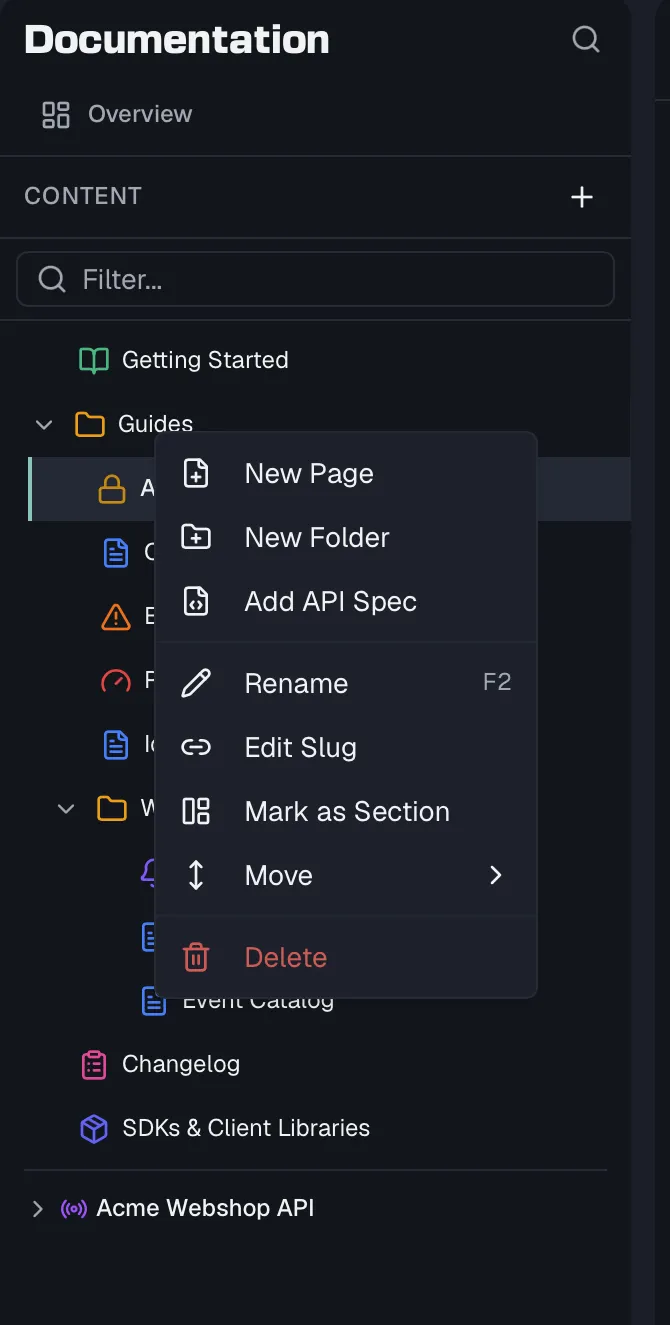
- Right-click any item for the context menu, which holds New Page, New Folder, Add API Spec, Rename, Edit Slug, Duplicate, Move Up, Move Down and Delete. Rename also responds to F2 or a double-click, Duplicate is for pages only, and API specs read Remove instead of Delete. Deleting asks for confirmation and cannot be undone.
- Root-level folders offer Mark as Section / Unmark as Section. Sections render as collapsible groups in the editor tree and as separate navigation areas in the published portal.
The folder overview
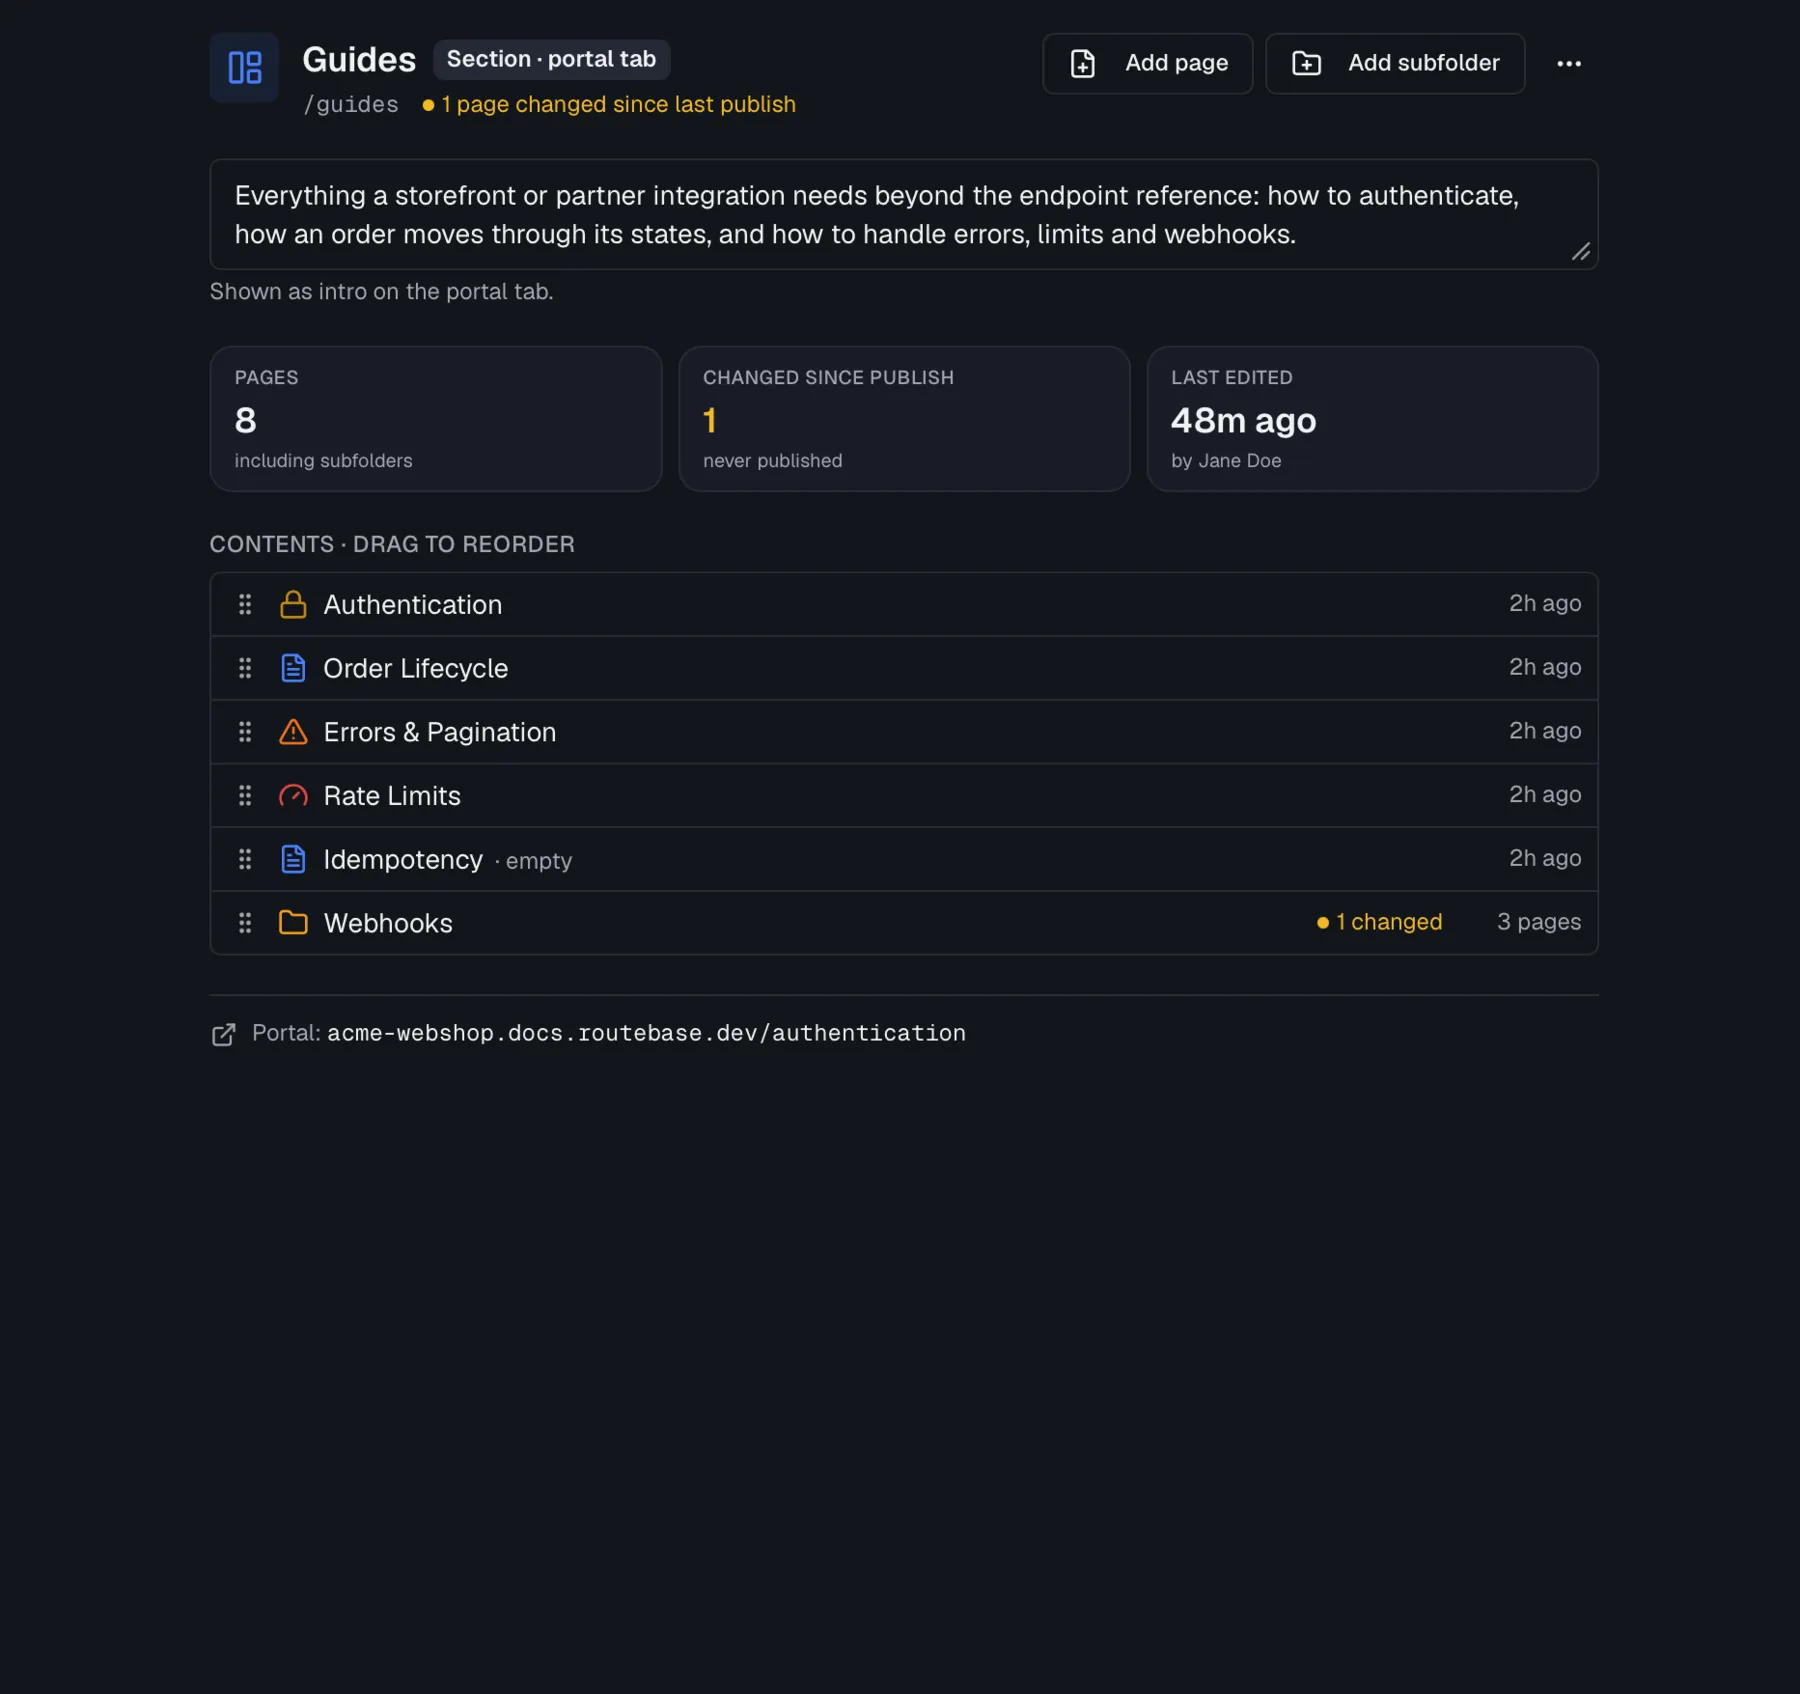
Clicking a folder or section name opens its own working surface on the right, while the chevron still expands and collapses. Clicking the name only ever expands, so the surface does not disappear under the click that opened it.
- The header carries the folder name, which you double-click to rename, its slug, and a Section · portal tab badge for sections. If pages below it changed since the last successful portal build, an amber line says how many. Add page and Add subfolder sit on the right, with Rename, Edit slug and Delete behind the ⋯ menu.
- The description is a text field that saves when you click away. On a section it doubles as the intro of the portal tab, and the hint below says so.
- The stats are Pages including subfolders, Changed since publish with the time of the last build or never published, and Last edited with the person who did it.
- Contents lists the folder's direct children. Drag the handle to reorder, which is the same operation as dragging in the tree, so both show the same order once you let go. Subfolders show the number of changed pages they contain, and a page with no content yet is marked · empty. An empty folder says so instead, with an Add your first page button.
- Portal appears for a section once the portal has an address, and this last row shows where that tab lives and links to it.
"Changed since publish" compares each page's last edit against the last successful portal build. Before a version has been built once there is nothing to compare against, so the marker falls back to what you have actually edited in that version. A version you just created by cloning therefore starts with no page marked, and a page only lights up once someone edits it there. Reordering alone does not count as a change, because the marker follows the pages rather than their order.
Read-only versions show the same surface without the input fields, the drag handles and the actions.
Pages and page types
Choosing New Page opens a type picker. Custom pages are free-form, while the eight specialized types are structured starting points that can each exist once per version. When a type is taken, its card is disabled with an "Already exists in this version" tooltip and a "Go to page" shortcut.
| Page type | Purpose |
|---|---|
| Custom Page | Free-form content with the rich text editor. |
| Getting Started | Prerequisites, installation, and first API call. |
| Authentication | Auth methods, configuration, and code examples. |
| Environments | Base URLs and environment configuration. |
| Error Codes | Error table, categories, and handling examples. |
| Rate Limits | Rate limit tiers, headers, and retry strategy. |
| Webhooks | Events, payloads, verification, and retry policy. |
| SDKs & Libraries | SDK cards, install commands, and quick start. |
| Changelog | Version history with categorized entries — see Changelog. |
Every type opens with a template picker, which Page Templates covers. All pages are edited with the same rich text editor, described under Authoring.
On the Free plan, each documentation version can contain up to 3 custom pages. The count is per version, so a new version starts with a fresh budget. The eight specialized types do not count against it, because they have their own once-per-version rule. Once the budget is used up, the New Page dialog refuses a further custom page and points at an upgrade. Paid plans have no limit.
API reference pages vs. custom pages
Custom pages are content you write, while API reference pages are generated from your API specs.
- In the tree's + menu, choose Add API Spec.
- Pick a specification from the project. Only specs with a published version can be added, and drafts show a "No Published Version" badge. Specs already in the tree show "Already added".
- Optionally check Enable API Playground to let readers send live requests from the reference pages.
- Choose the Endpoint Structure, which is either Folder-based to group by the spec's folders or tags, or Flat List.
- Click Add Specification.
The spec is embedded as a snapshot pinned to the published version, so later spec edits do not silently change your docs. When a newer published spec version exists, a banner appears on the reference view reading "API Reference pinned to vX. Version vY available." with an Update button. You can also switch a spec node between folder and flat view from its context menu, and drag-reorder its endpoints and groups directly in the tree.
Selecting the spec node opens a scrollable reference of every endpoint, with a header card showing the endpoint count and whether the playground is enabled. In editable versions, each endpoint has a collapsible Notes field for adding documentation-side annotations without touching the spec itself.
Slugs
Every page and folder has a URL slug used in the published portal and in navigation. Slugs contain only lowercase letters, numbers and single hyphens.
- Slugs are generated from the title when you create a page or folder, but you can override them in the creation dialog.
- Renaming an item later does not change its slug. To change it, use Edit Slug in the context menu. The dialog notes that existing links to the published page keep using the slug they were published with.
Searching your documentation
Press ⌘K or click the search icon to open documentation search. Type at least two characters, then filter results by All, Pages, Endpoints or Folders. Selecting a result jumps to it in the tree. Search works in draft versions too, because Routebase builds a local index from the tree until the version is published.
Documentation settings
The Settings button at the foot of the sidebar opens Documentation Settings with three tabs:
- General holds the version numbering scheme, the approval workflow, Schema Display, and the Code Languages shown as tabs in code examples. The languages are cURL, HTTPie, JavaScript, Python, C#, Go, Java, Ruby and PHP. Only the languages you select are rendered, in the app and on the published portal, and selecting none shows all of them. See Versioning for the versioning options.
- Public Portal holds everything about hosting and publishing the portal, split into the five tabs Publish, Appearance, Features, Advanced and Insights. See Publishing.
- Snippets holds the reusable content snippets for the selected version.
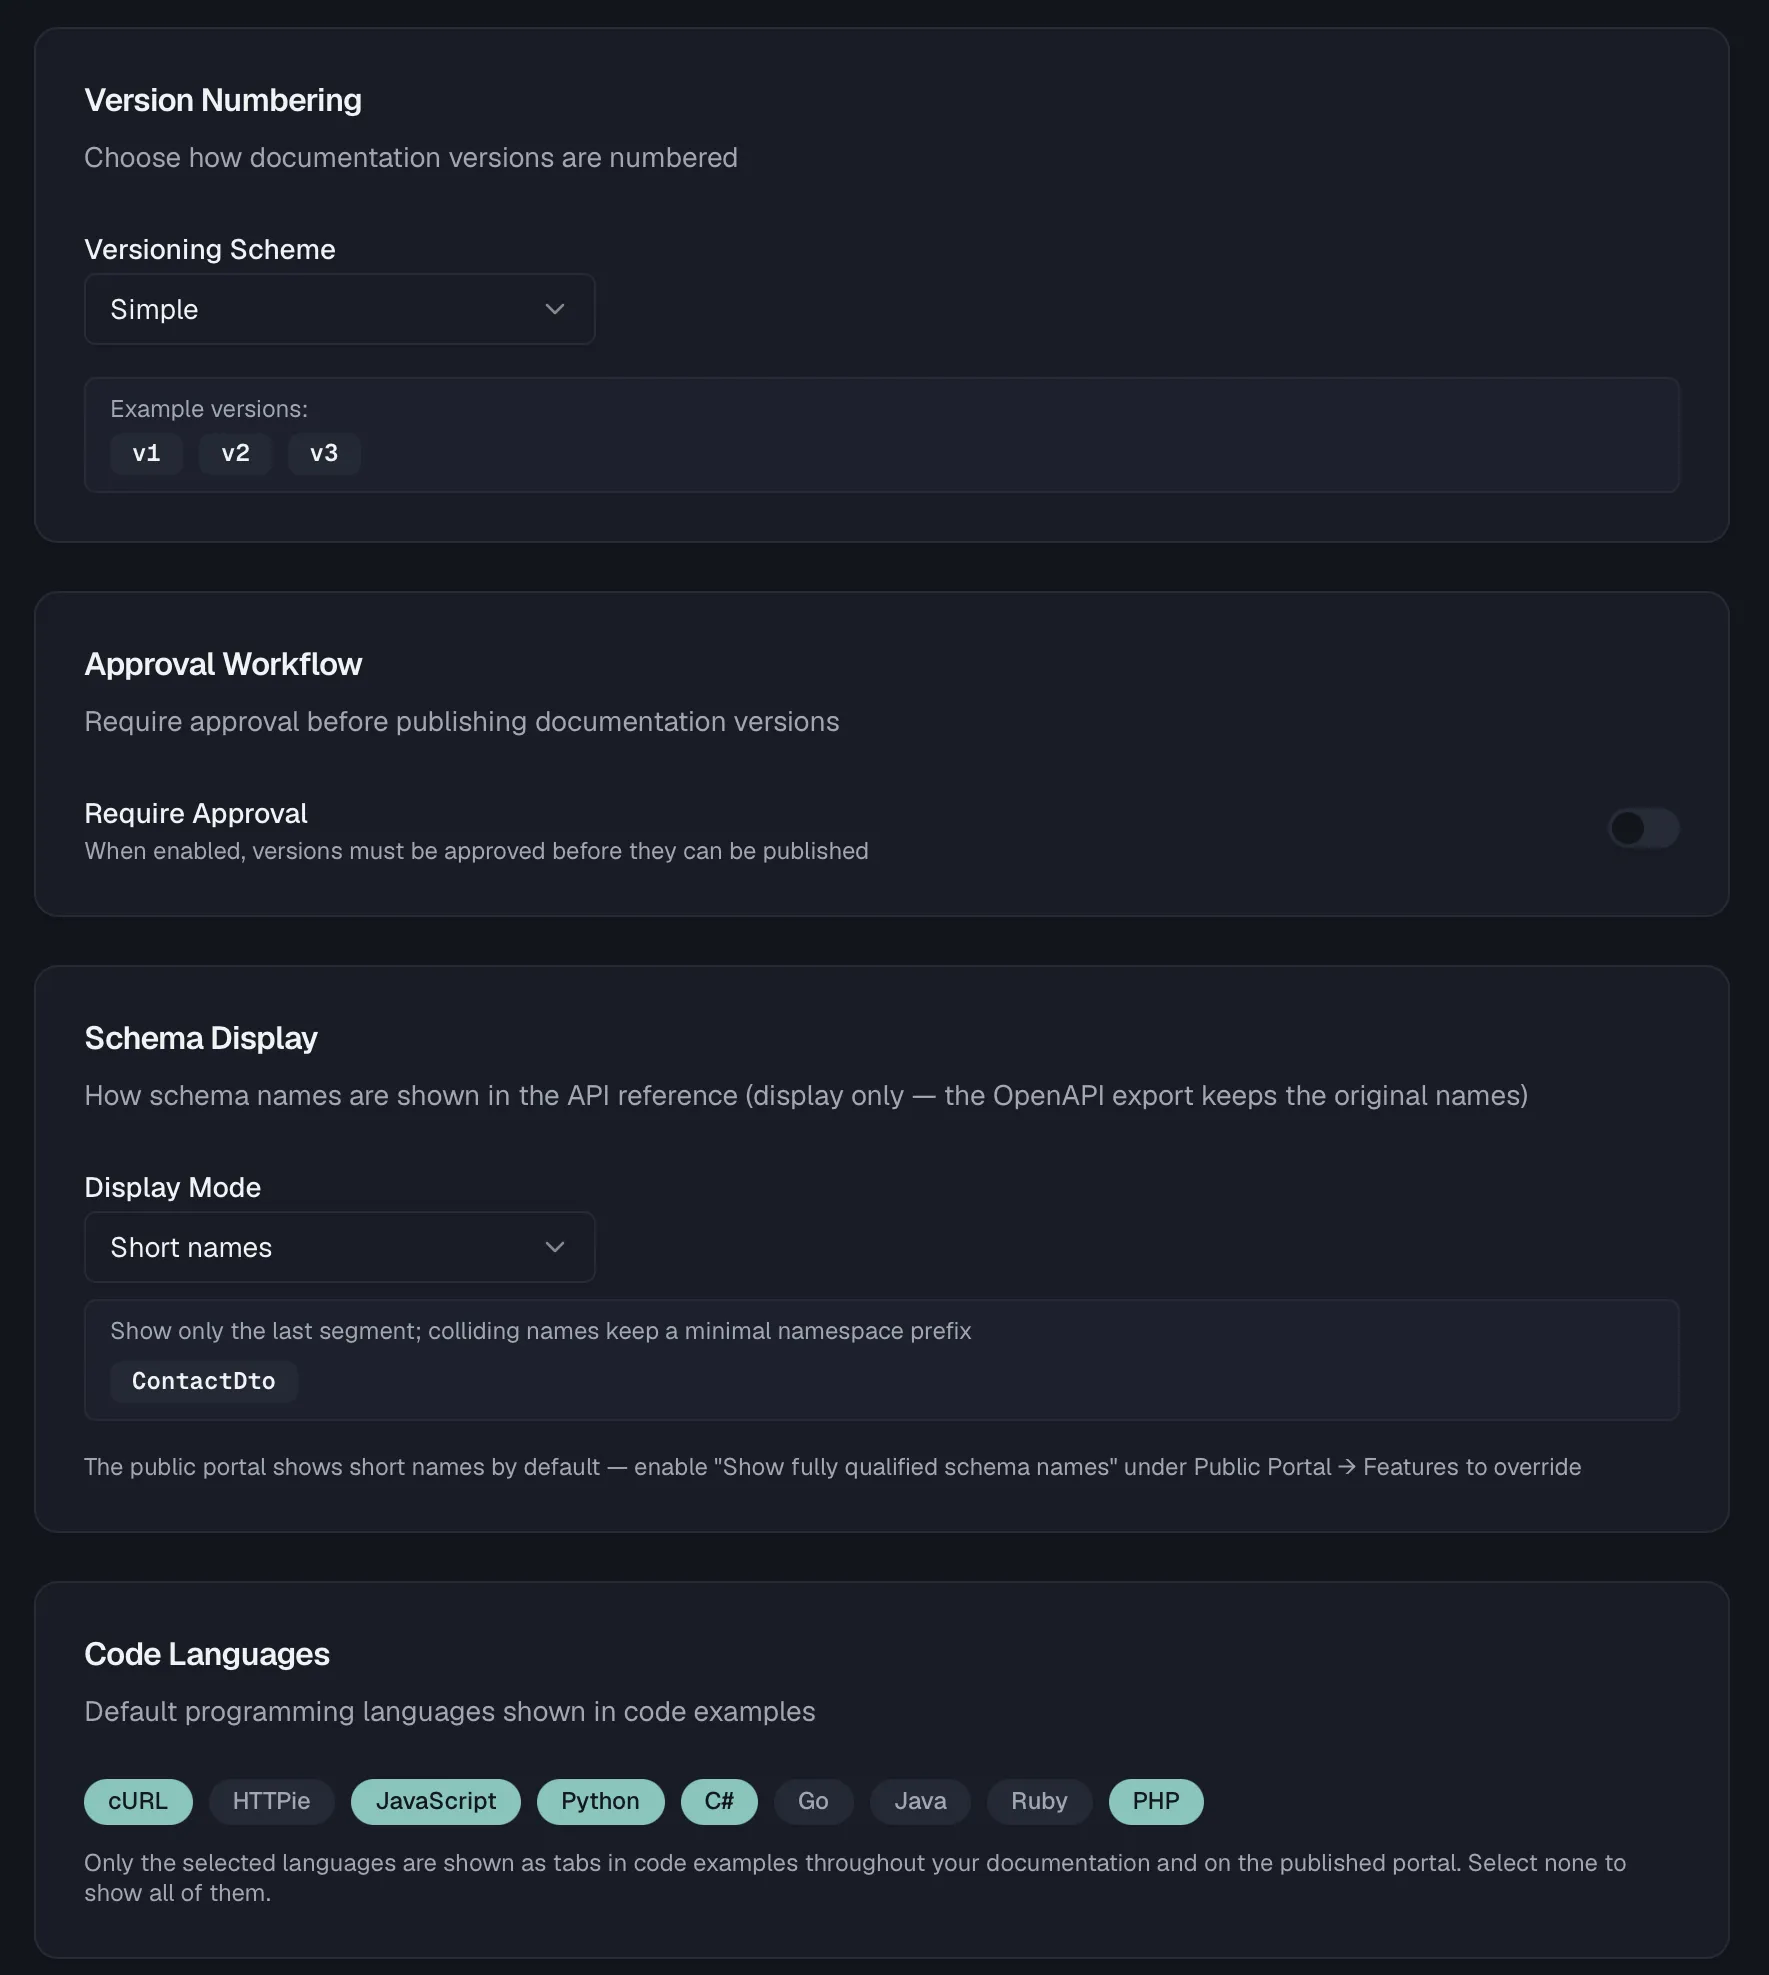
Schema Display controls how schema names appear in the API reference. It affects the display only, because the OpenAPI export keeps the original names. Choose a Display Mode from three options. Full names shows names exactly as imported, Short names shows just the last segment and keeps a minimal namespace prefix only where names collide, and Strip prefix removes a namespace prefix you specify. The public portal shows short names by default, and the Show fully qualified schema names toggle under Public Portal → Features overrides that for readers.
Working on documentation from an AI agent
The documentation module is fully exposed over the Routebase MCP server, so an agent can read and write your docs with the same permissions your API key carries. It is not a read-only view of the portal, because the whole authoring loop is there.
Three toolsets cover it. Enable them with enable_toolset, and call set_context for the project first.
| Toolset | Slug | What it covers |
|---|---|---|
| Documentation | documentation |
The content tree, pages, folders, versions, spec snapshots and snippets |
| Portal Administration | portal-admin |
Portal settings, custom domains, builds, deployments, analytics and page feedback |
| Portal Docs Search | portal-docs |
Two read tools against a published portal |
The tools you will reach for most:
- Read the structure with
get_doc_tree, which returns the folders, pages and spec snapshots of a version as a typed hierarchy.list_documentationsandget_doc_settingscover the surrounding configuration. - Write content with
create_doc_pageandupdate_doc_page, which take Markdown directly. Updating a page can also set a new slug, and the old one then redirects on the published portal. Both only work on a mutable version, meaning Draft or In Review, because a live version is refused exactly as in the editor. - Restructure with
manage_doc_tree,manage_doc_folderandmanage_doc_page, which handle moving, renaming and deleting.manage_spec_snapshotembeds and refreshes API references, whilemanage_doc_versionandclone_doc_versionhandle the version lifecycle. - Ship it with
publish_doc_version, which takes a version in Review live, andtrigger_portal_build, which renders and uploads the portal. See Publishing. - Read a published portal with
search_portal_docs, which does keyword search across the latest published version and returns slugs.get_portal_pagethen returns one page with its full Markdown. Both help agents that consume your docs rather than write them.
Permissions map one-to-one onto the ones described above. Reads need docs:read and writes need docs:write, while publish_doc_version needs docs:publish and anything touching the portal itself needs docs:manage-portal. A key without a scope does not merely fail the call, because the tool is not offered in the first place.
There is also an MCP resource, routebase://docs/{docId}/pages, which hands an agent every page of the latest published version with its Markdown content in one read.
Read-only versions
Live and archived versions are immutable. The tree shows a "This version is read-only" indicator, pages open in reader mode, and all editing affordances are hidden. To make changes, clone the version into a new draft, as described under Versioning.
Related
- Authoring — the rich text editor, blocks, and slash commands
- Versioning — drafts, review, and going live
- Publishing — hosting the portal
- Endpoints — designing the API specs your references are built from
- MCP Quickstart — connecting an AI agent to this workspace