

Endpoints
Endpoints are the core building blocks of your API. Each endpoint pairs an HTTP method with a path and describes what goes in and what comes out, which covers the parameters it accepts, the request body it expects and the responses it returns.
Anatomy of an endpoint
| Field | What it is |
|---|---|
| Method | The HTTP verb: GET, POST, PUT, PATCH, DELETE, HEAD, or OPTIONS. Specifications authored as OpenAPI 3.2 also offer QUERY, a safe read whose parameters travel in the request body. |
| Path | The URL template, with path variables in braces — e.g. /users/{id}. Must start with /. |
| Summary | A short one-line label shown in lists and navigation. |
| Description | The long-form explanation that appears in your documentation. |
| Operation ID | A unique, stable identifier used by code generators and SDKs. Routebase generates one from the method and path; you can override it. |
| Tags | Labels you can filter by. They are also part of the exported contract — see Tags below. |
| Deprecated | A flag that marks the operation as being on its way out. |
Opening the API Designer
Endpoints live in an API specification inside a project. Open API Design from the sidebar while a project is active. If the project has no specification yet, you can start three ways:
- Empty Specification starts with a blank canvas so you add endpoints manually.
- Import brings in an existing OpenAPI file, Postman collection or Insomnia export. Routebase validates it, previews what will be created, and lets you fix the file in place if validation fails. See Import & Export.
- Use Template starts from a pre-built template such as CRUD or Auth.
Every specification has a Name, a semantic Version such as 1.0.0, an OpenAPI Version of 3.0, 3.1 or 3.2, an optional Base Path and a Description. The base path is a prefix like /api/v1 applied to all endpoints. You can rename a specification or change its base path later, and you can delete it entirely. Deleting a specification also deletes all endpoints, schemas and versions it contains.
On the Free plan a specification can hold up to 20 endpoints, and the create dialog shows an upgrade prompt with a Limit Reached state once you hit the cap. Paid plans have no endpoint limit.
Creating an endpoint
- In the endpoint tree, click the + button and choose Add Endpoint. A folder's context menu offers New Endpoint for the same thing.
- Choose a Method and enter the Path, for example
/users/{id}. - Optionally add a Summary, a Description and an Operation ID. If you leave the Operation ID empty, Routebase generates one and warns you when an ID already exists in the spec.
- Click Create.
Path variables in braces are detected automatically, so creating GET /users/{id} also creates the path parameter id for you. See Parameters for how path parameters stay in sync with the URL.
The endpoint tree
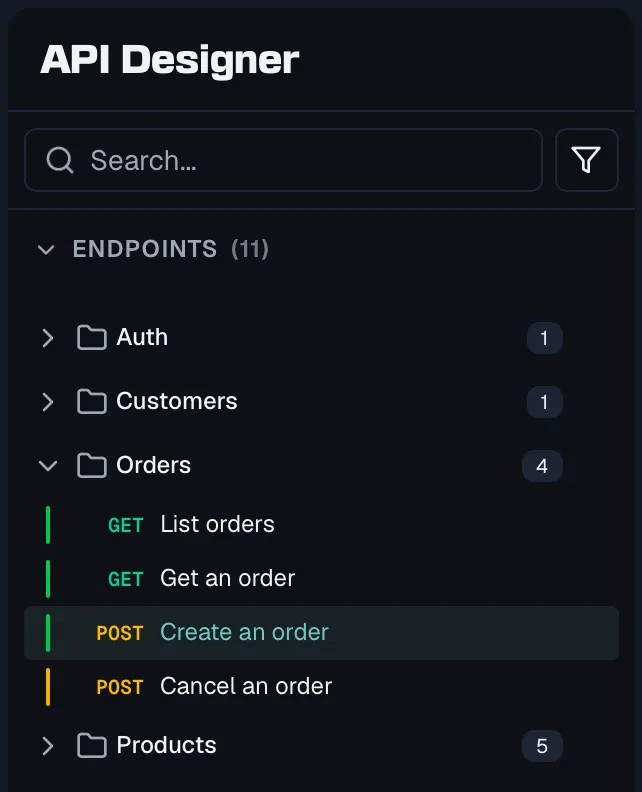
The sidebar lists all endpoints of the selected version, organized into folders, with a Components section below for reusable definitions (see Components).
- Search filters endpoints as you type.
- Quick filters give you one-click method filters for GET, POST, PUT and DELETE, plus a completeness dropdown offering All Endpoints, Complete Only and Incomplete Only.
- Filter opens a popover with more criteria. It covers HTTP Method across all seven verbs, Path Pattern where
*works as a wildcard as in/users/*, plus Tags, Show deprecated and Show only with issues. Active filters show a count badge, and Clear all resets them. - Expand All and Collapse All toggle every folder at once.
Each endpoint row carries a colored status line:
| Line | What it means |
|---|---|
| Green | The endpoint is complete. |
| Yellow | It still has validation issues. Hover to see errors, warnings and hints. |
| Gray | It is deprecated. |
Organizing endpoints in folders
Routebase organizes endpoints in a folder tree rather than flat tag groups. Create folders that mirror how you think about your API, whether that is by resource, by domain or by team. The tree is the same structure your readers see in the published documentation, so a clean hierarchy pays off twice.
- Create a folder with Add Folder from the tree's + menu, or with New Subfolder from a folder's context menu. Each folder has a name and an optional icon.
- Rename or edit a folder by right-clicking it and choosing Rename, or by pressing F2. Edit Properties changes name and icon and shows the folder's endpoint and subfolder counts.
- Move things by dragging endpoints between folders and dragging folders to re-nest or reorder them. Dropping at the root level ungroups an endpoint.
- Delete a non-empty folder and Routebase asks what to do with its contents. Move to parent folder and Move to "Ungrouped" keep them, the second one at the root level. Delete everything permanently deletes all endpoints and subfolders, and that cannot be undone.
Tags
Folders and tags are complementary, because folders define the visible hierarchy while tags are flat labels across it. Add or remove tags directly in the endpoint editor header.
Tags are more than filter chips, and this is worth knowing before you treat them as throwaway labels. Each tag can carry a description, an icon and a position in a curated order. The description is exported as the OpenAPI tag description, so it reaches every tool that reads your spec rather than only Routebase.
In your published API reference, endpoints are grouped by their first tag, and anything untagged lands in a "Default" group. Each group gets an introduction, which is the folder's description if the folder has one and otherwise the description of the tag with the same name. A tag description is documentation, not a private note.
The sidebar has a Tags row below the endpoint list, and it opens the tag manager in the main panel. There you create tags, reorder them by dragging, pick an icon and edit the description, and the same list is available to agents through the MCP server.
In a specification written as OpenAPI 3.2, a tag can additionally carry a summary, a parent tag and a kind. The summary is a short label, the parent nests the tag under another tag of the same version, and the kind is free text where the OpenAPI specification suggests nav, badge and audience. All three are exported with the spec and imported from a 3.2 file, and an imported parent that does not resolve is dropped with a warning while the tag itself is kept. When a spec has no folders, the published reference nests its groups by these parent tags, so an imported 3.2 spec keeps the structure its author intended. Folders still win when both exist, and the kind changes nothing in the rendering yet.
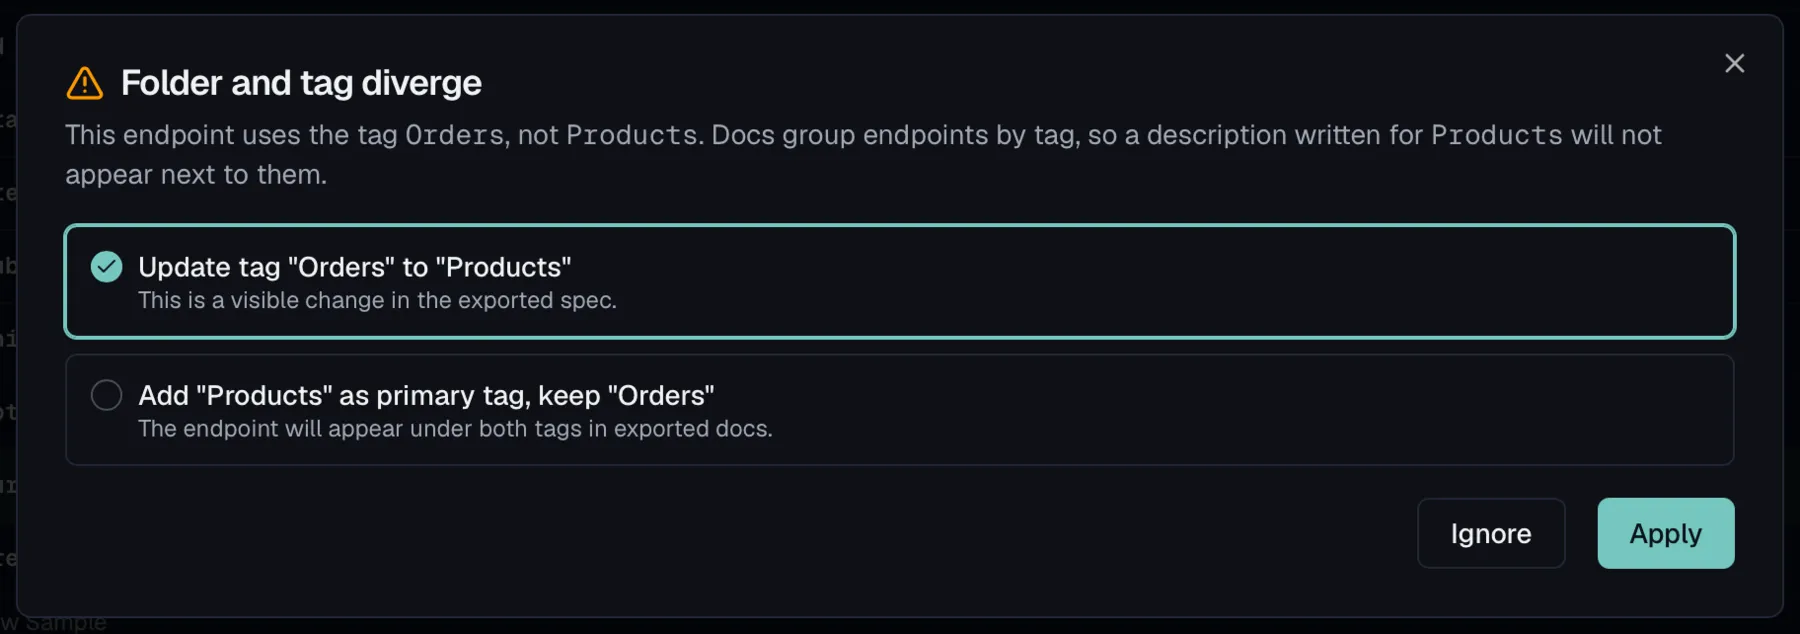
Because folders and tags describe the same grouping from two sides, they can drift apart. That happens most easily when you move endpoints into a different folder while their tags still name the old one. Routebase notices and offers three ways out rather than picking for you:
- Update the tags to match the folder they now live in.
- Rename the folder to the tag the endpoints already share.
- Add the folder name as an additional tag, keeping the existing ones.
The dialog says which option changes what your consumers see. Renaming the folder is "No contract change — the exported spec stays exactly as it is", while editing tags is "a visible change in the exported spec". You can also ignore it, and a banner on the folder stays as a reminder.
Editing an endpoint
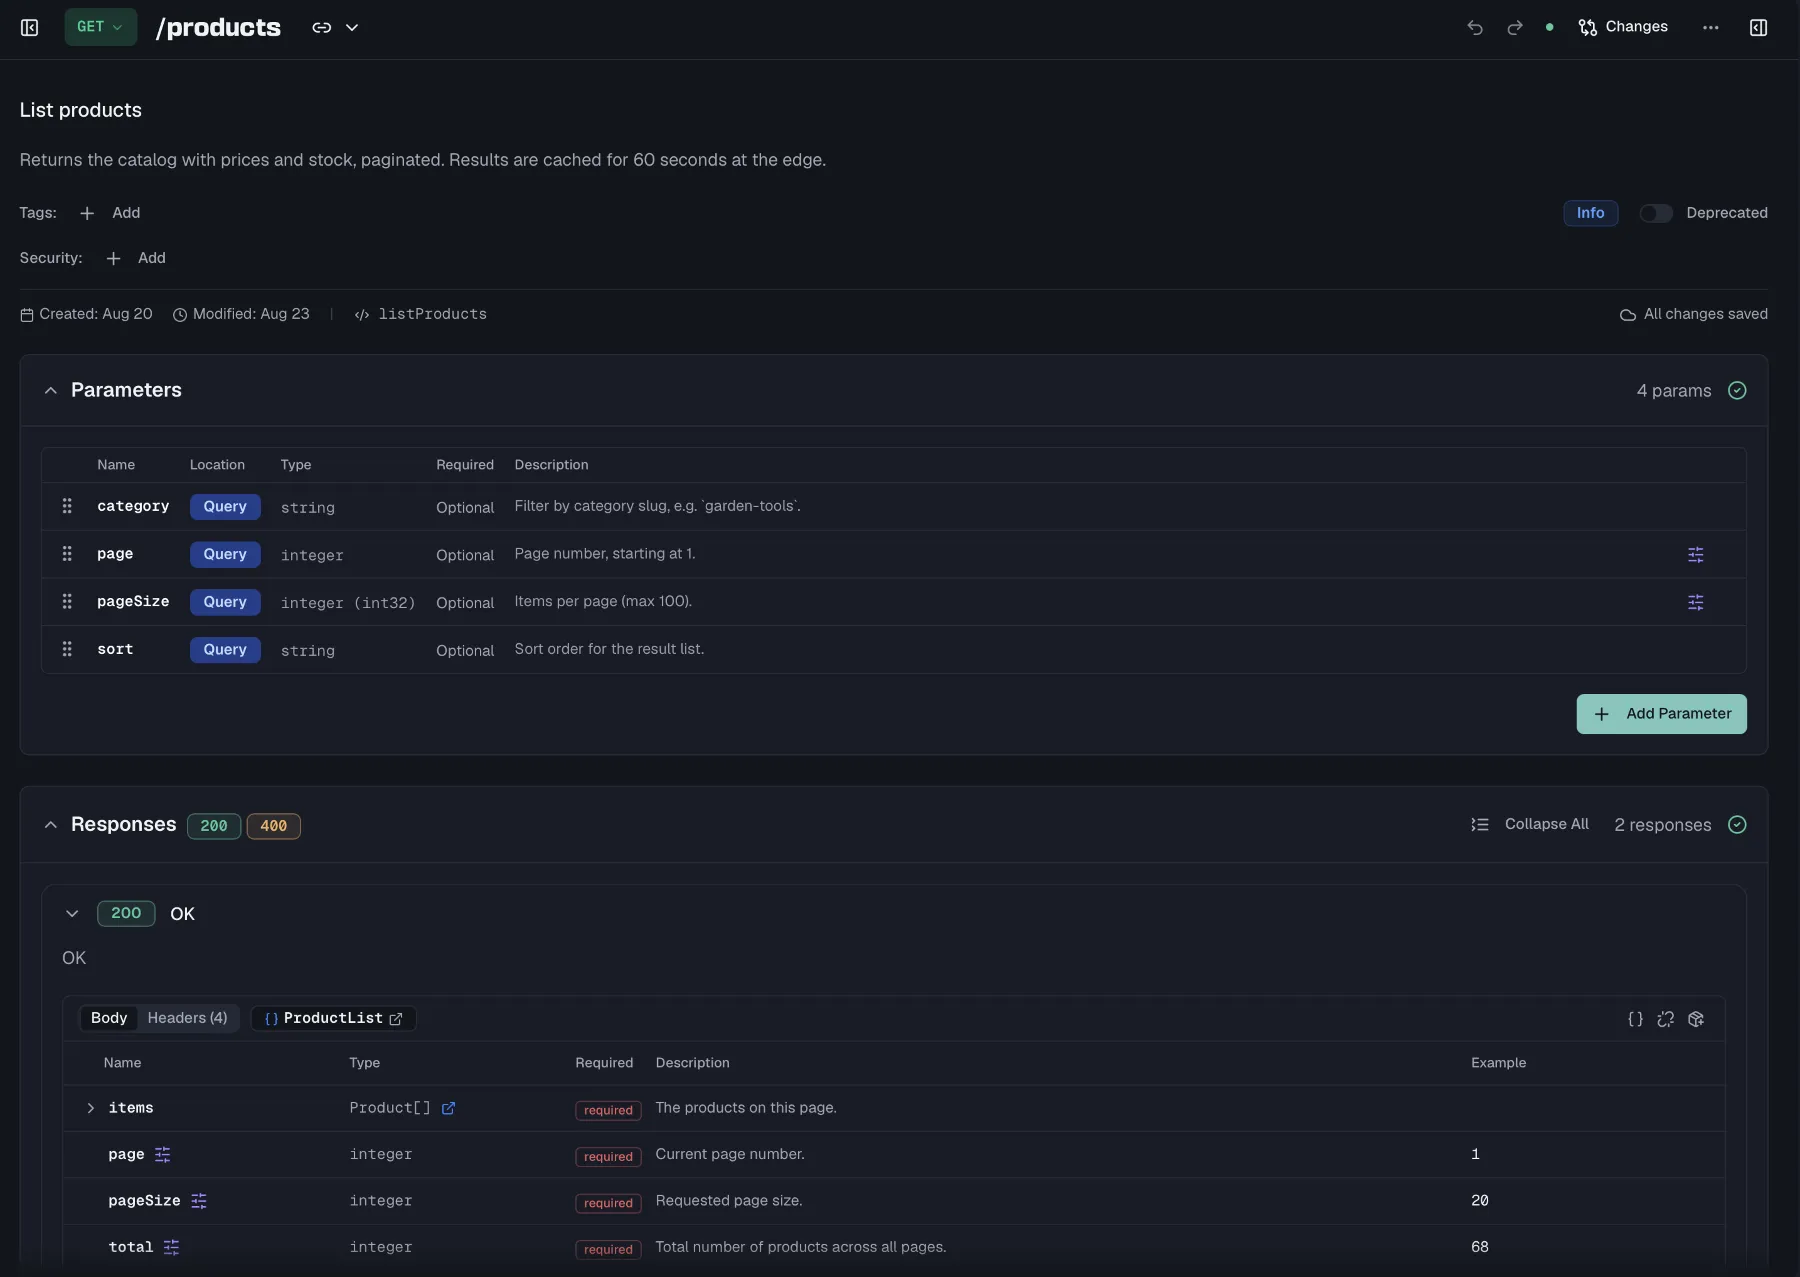
Selecting an endpoint opens the editor. The header holds the method, path, summary, description, operation ID, tags and the deprecated toggle, all edited inline. When you change the method, only methods not already used by another endpoint on the same path are offered. Below the header, three collapsible sections define the contract:
- Parameters are covered in Parameters.
- Request Body appears for
POST,PUT,PATCHandQUERYendpoints. Choose a content type, which defaults toapplication/jsonand also offers XML, form, text and binary types. Then mark the body Required, define the structure inline or link a reusable definition, and maintain an example. See Components and Schemas. - Responses are covered in Responses.
Each section header shows a completeness indicator, so you can see at a glance which parts of the contract still need work.
Writing the description
The description is not a plain text field. It opens a full editor, because for many endpoints the description is the documentation. It is where you explain what the schema cannot, such as the order of calls, what a status actually means, and which of two similar endpoints to use.
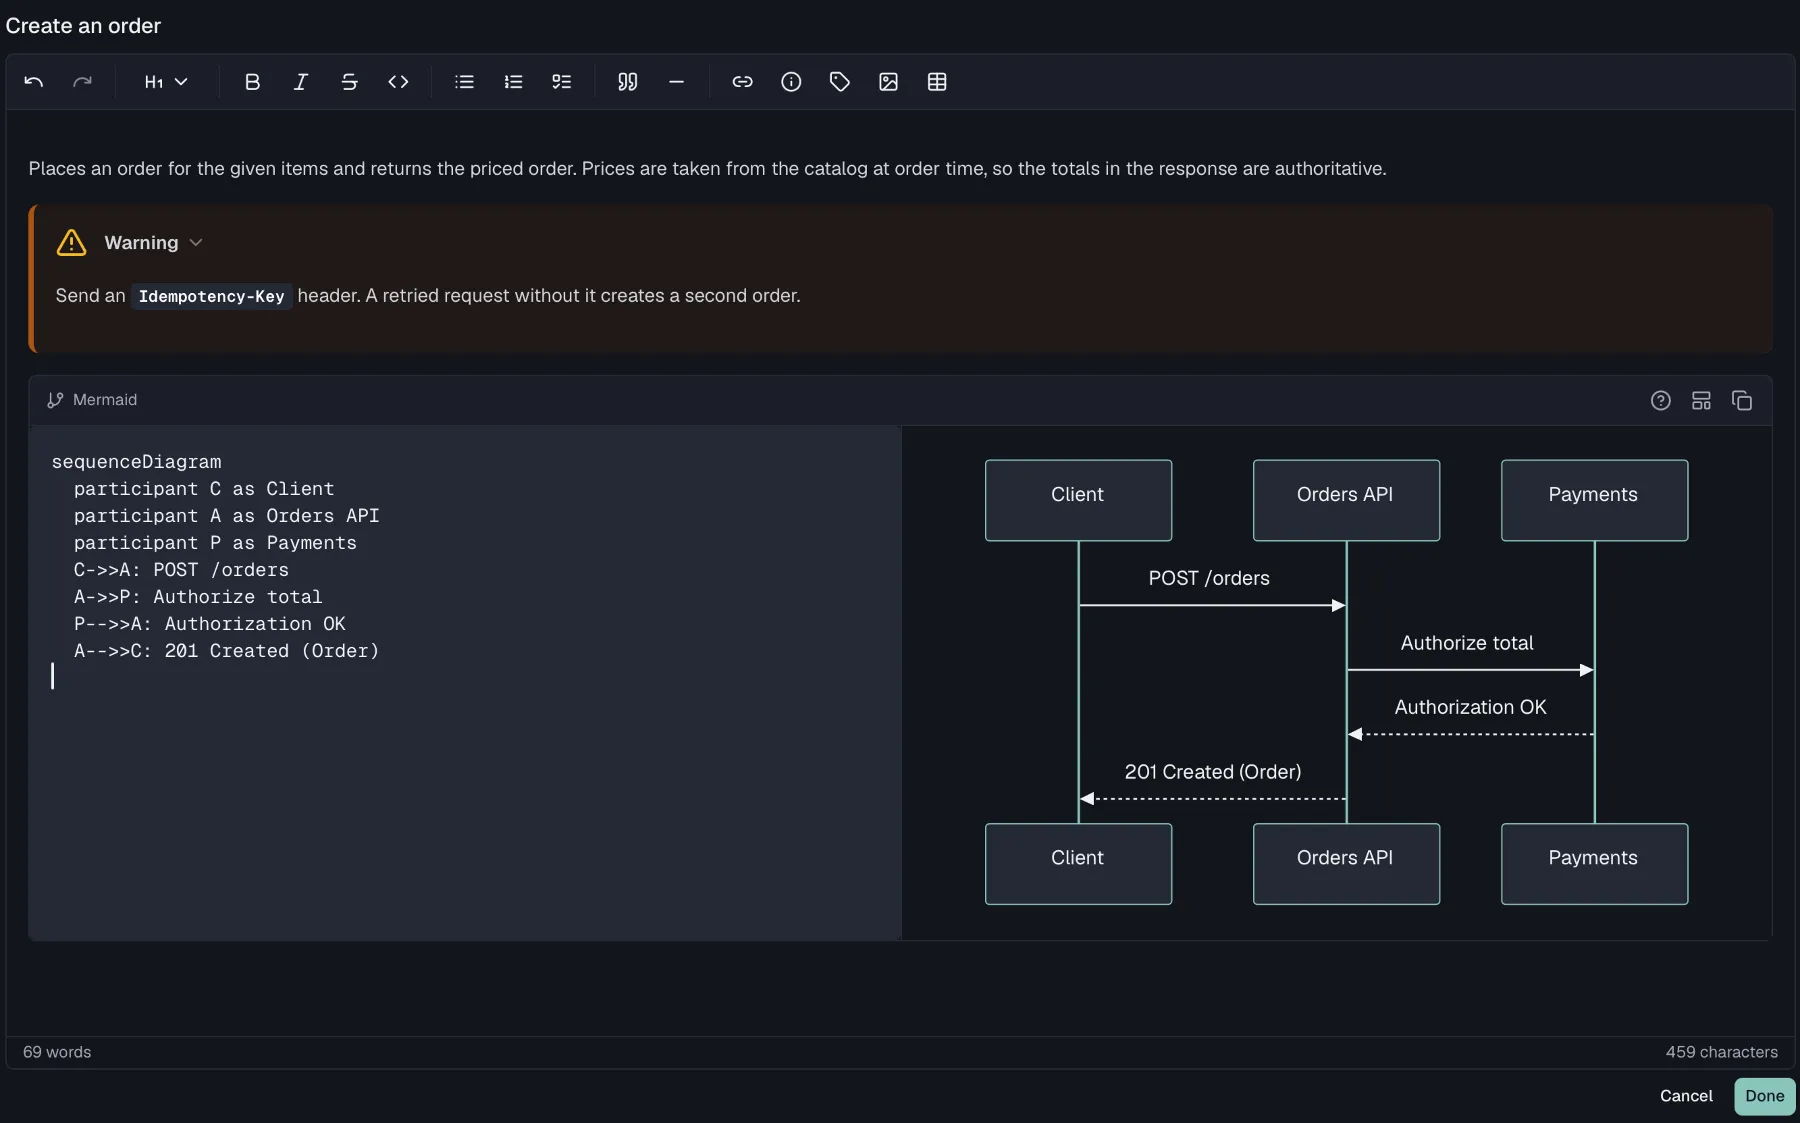
What you can put in it:
- Callouts in the four flavours info, tip, warning and error, for the sentence a reader must not skim past.
- Tabs, for showing the same thing per language or per use case without tripling the page.
- Mermaid diagrams in four kinds, which are flowcharts, sequence diagrams, entity-relationship diagrams and state diagrams. A sequence diagram in an authentication endpoint's description saves several paragraphs.
- Tables, code blocks, images, links, lists and quotes.
All of it renders in your published documentation. Folders have their own description editor too, in the folder detail view, and that is where a group of endpoints gets its introduction. See Tags for how that reaches the portal.
Autosave and collaboration
Changes save automatically. The save indicator in the header shows the current state as Saving..., Saved, Unsaved changes, Offline or Save failed with a retry option. In the offline state your changes sync once you are back online. When teammates work on the same endpoint, Routebase shows who is editing, warns about incoming remote changes, and opens a conflict resolution dialog if two people change the same fields. There you choose field by field which value wins.
Duplicating an endpoint
To build a similar endpoint, open the … menu on an endpoint row or right-click it, then choose Duplicate. The dialog pre-fills the method, a modified path, the summary with a "(Copy)" suffix and a unique operation ID. Adjust any of them and click Duplicate. The copy includes the source endpoint's parameters and responses.
Deprecating an endpoint
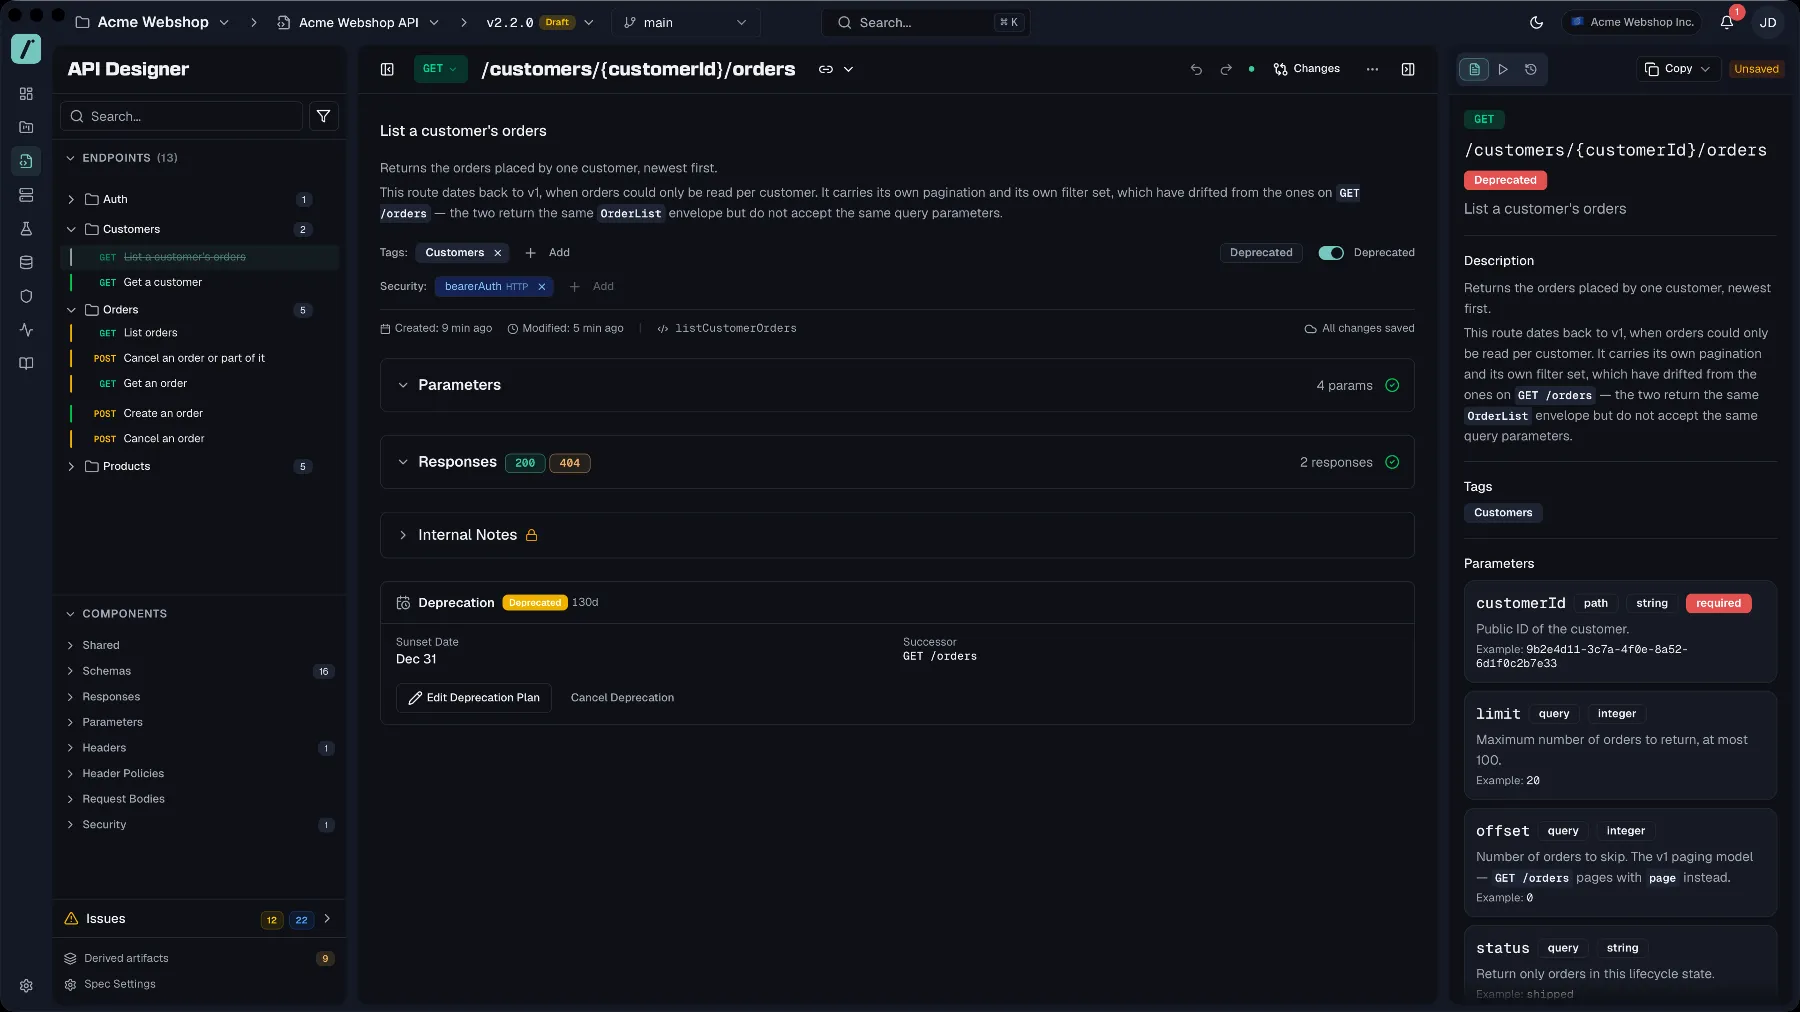
When an operation is on its way out, deprecate it instead of deleting it. Deprecated endpoints stay in your spec and documentation with a clear badge, so existing consumers are warned while the contract stays intact. Use the tree filter's Show deprecated switch to hide them while you work.
The Deprecated toggle in the editor header is the quick way to mark one, because it sets the flag in the spec and nothing else happens. For an endpoint consumers actually call, the deprecation wizard is the better path. It turns "this is going away" into a dated plan with a successor, a migration guide, an approval step and reminders, and Deprecation covers it in full.
On a published portal, a deprecated endpoint's page carries a banner with the sunset date, how many days are left, the rendered migration guide, and a link to the successor endpoint where there is one. A consumer reading the documentation learns about it without anyone having to send an email, which is the point of doing it this way rather than deleting the endpoint and waiting for the support ticket.
Internal notes
Every endpoint has an Internal Notes section at the bottom of the editor that is visible to your team inside Routebase but never exported to your public documentation. Use it for implementation details, open questions or migration reminders that should not reach API consumers.
Deleting an endpoint
Choose Delete from the endpoint's context menu or … menu. The confirmation dialog shows the method and path and warns that the action cannot be undone. Deleting endpoints, folders or specifications requires the specs:delete permission, which by default means Admins and Owners. Members can create and edit but not delete.
Try It — sending a real request
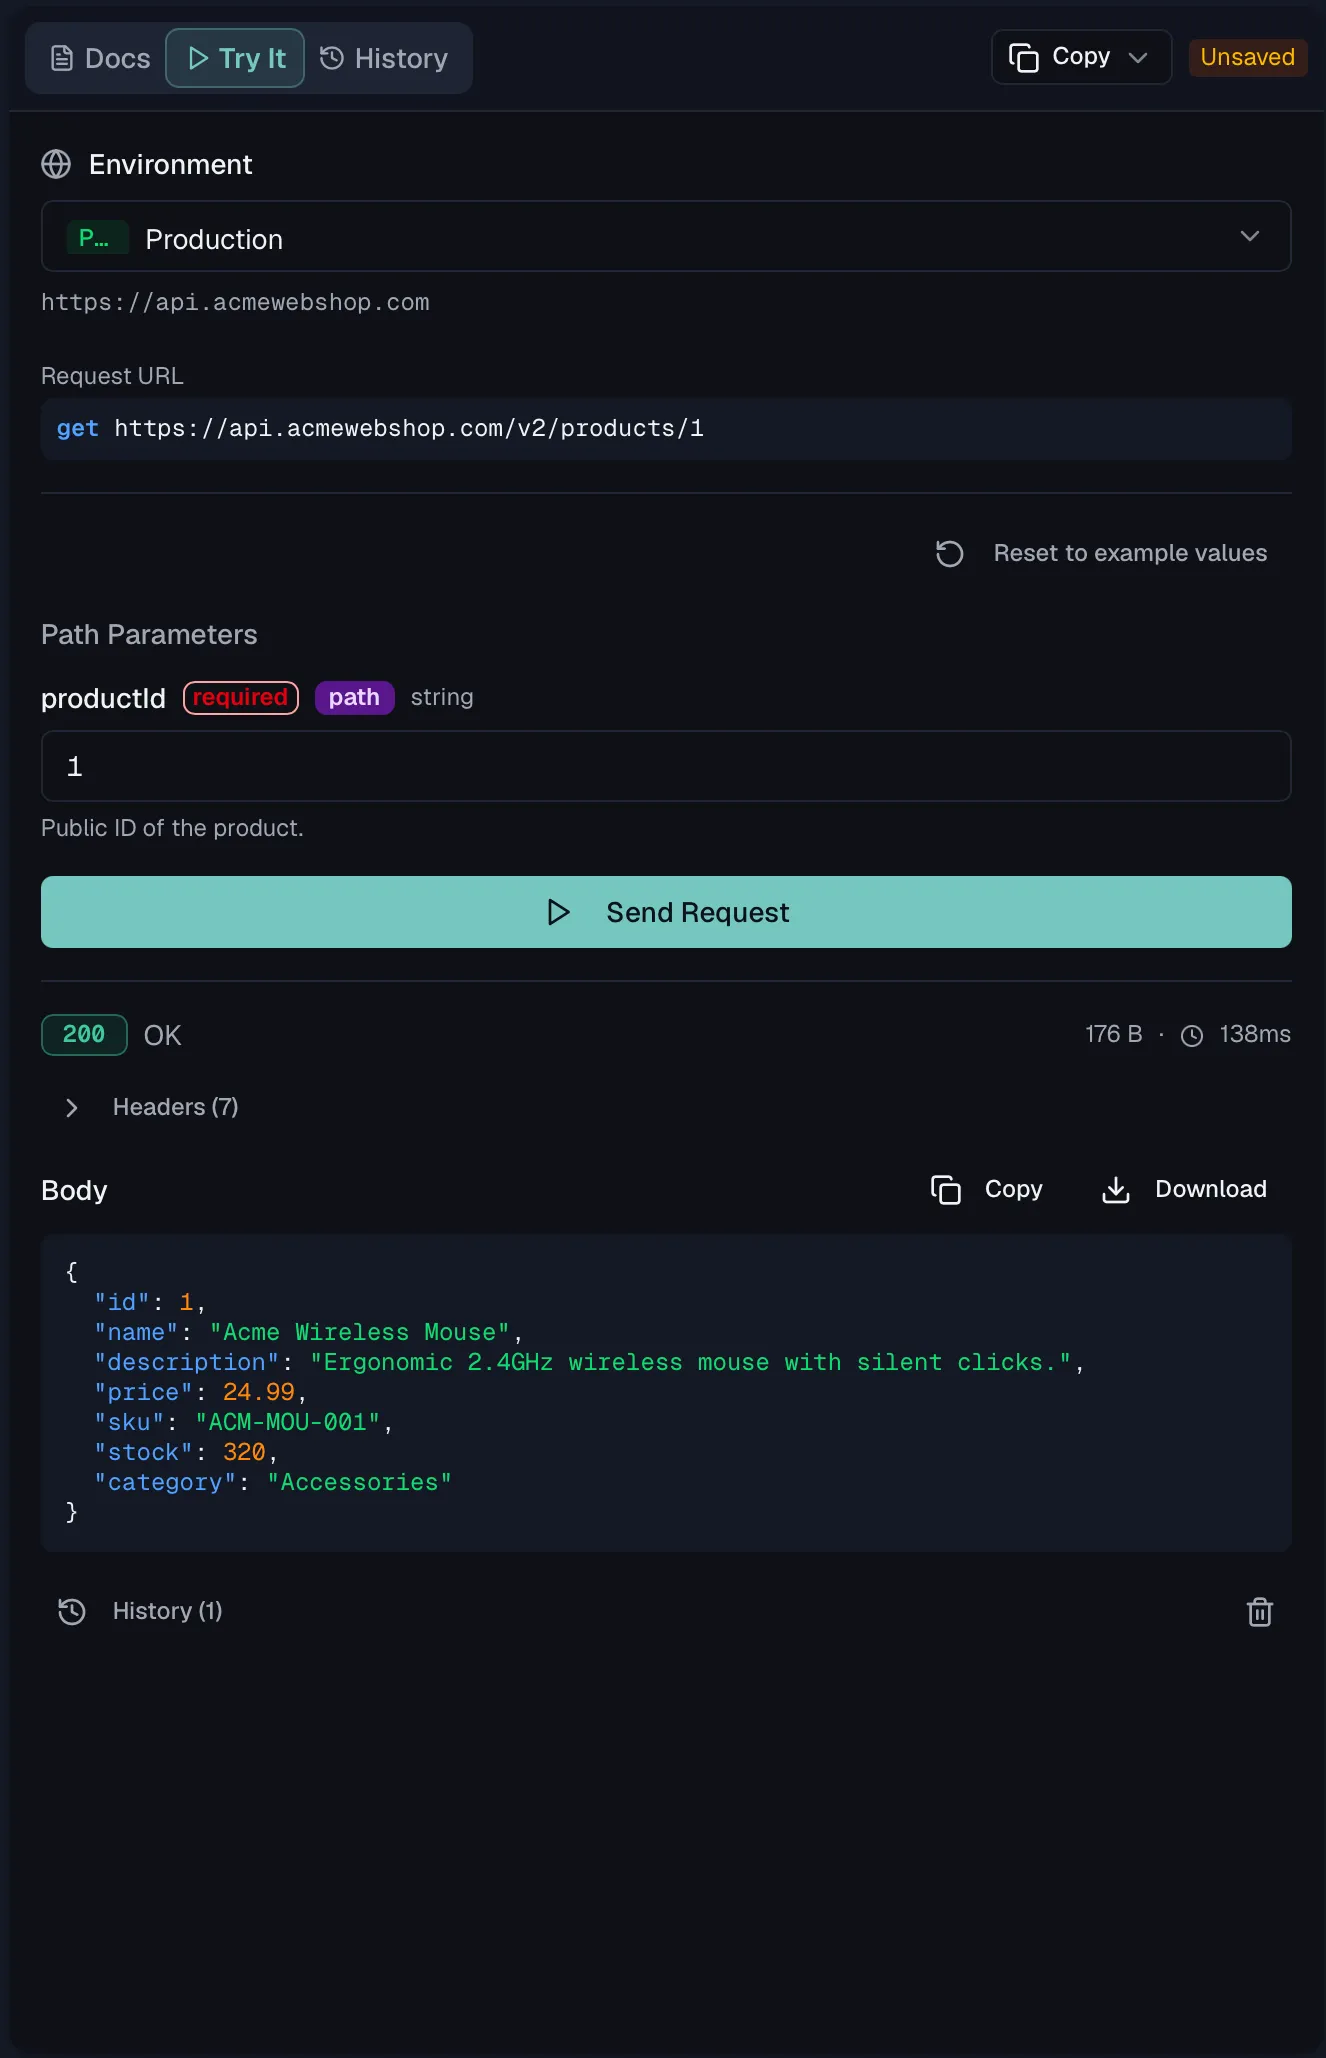
The Try It tab of the endpoint editor sends an actual request for the endpoint you have open, without leaving the designer. It is how you check that the thing you designed behaves the way you described it.
Pick a target in the environment selector at the top. Two kinds of target exist:
- Any environment of the project takes the request to its base URL, with its variables and its authentication. An environment marked read-only says so, and one without a base URL tells you plainly with "This environment has no base URL configured."
- Mock Server takes the request to your mock server instead. That is useful long before the real API exists, and if no mock is set up yet, Routebase creates one on the spot.
Fill in the request. Path parameters, query parameters, headers and the request body each get their own section, built from what the endpoint declares. The form therefore matches the contract rather than being a blank text box. A query string parameter of a 3.2 specification gets one field for the whole string, and Try It appends what you type after the ? without changing it, because the value is already encoded for its content type. Above the send button, the Request URL shows the fully resolved address with variables substituted, so you can see what will actually be sent.
Sending against the mock has one wrinkle worth knowing. The mock applies no environment authentication, because no environment travels with the request. An endpoint whose mock rules gate on an auth header will answer 401 until one is sent. Rather than always attaching credentials, Try It offers an Add {header} header button that adds the demo header the endpoint's security schemes ask for. That way the 401 path stays testable, because you see it by not clicking.
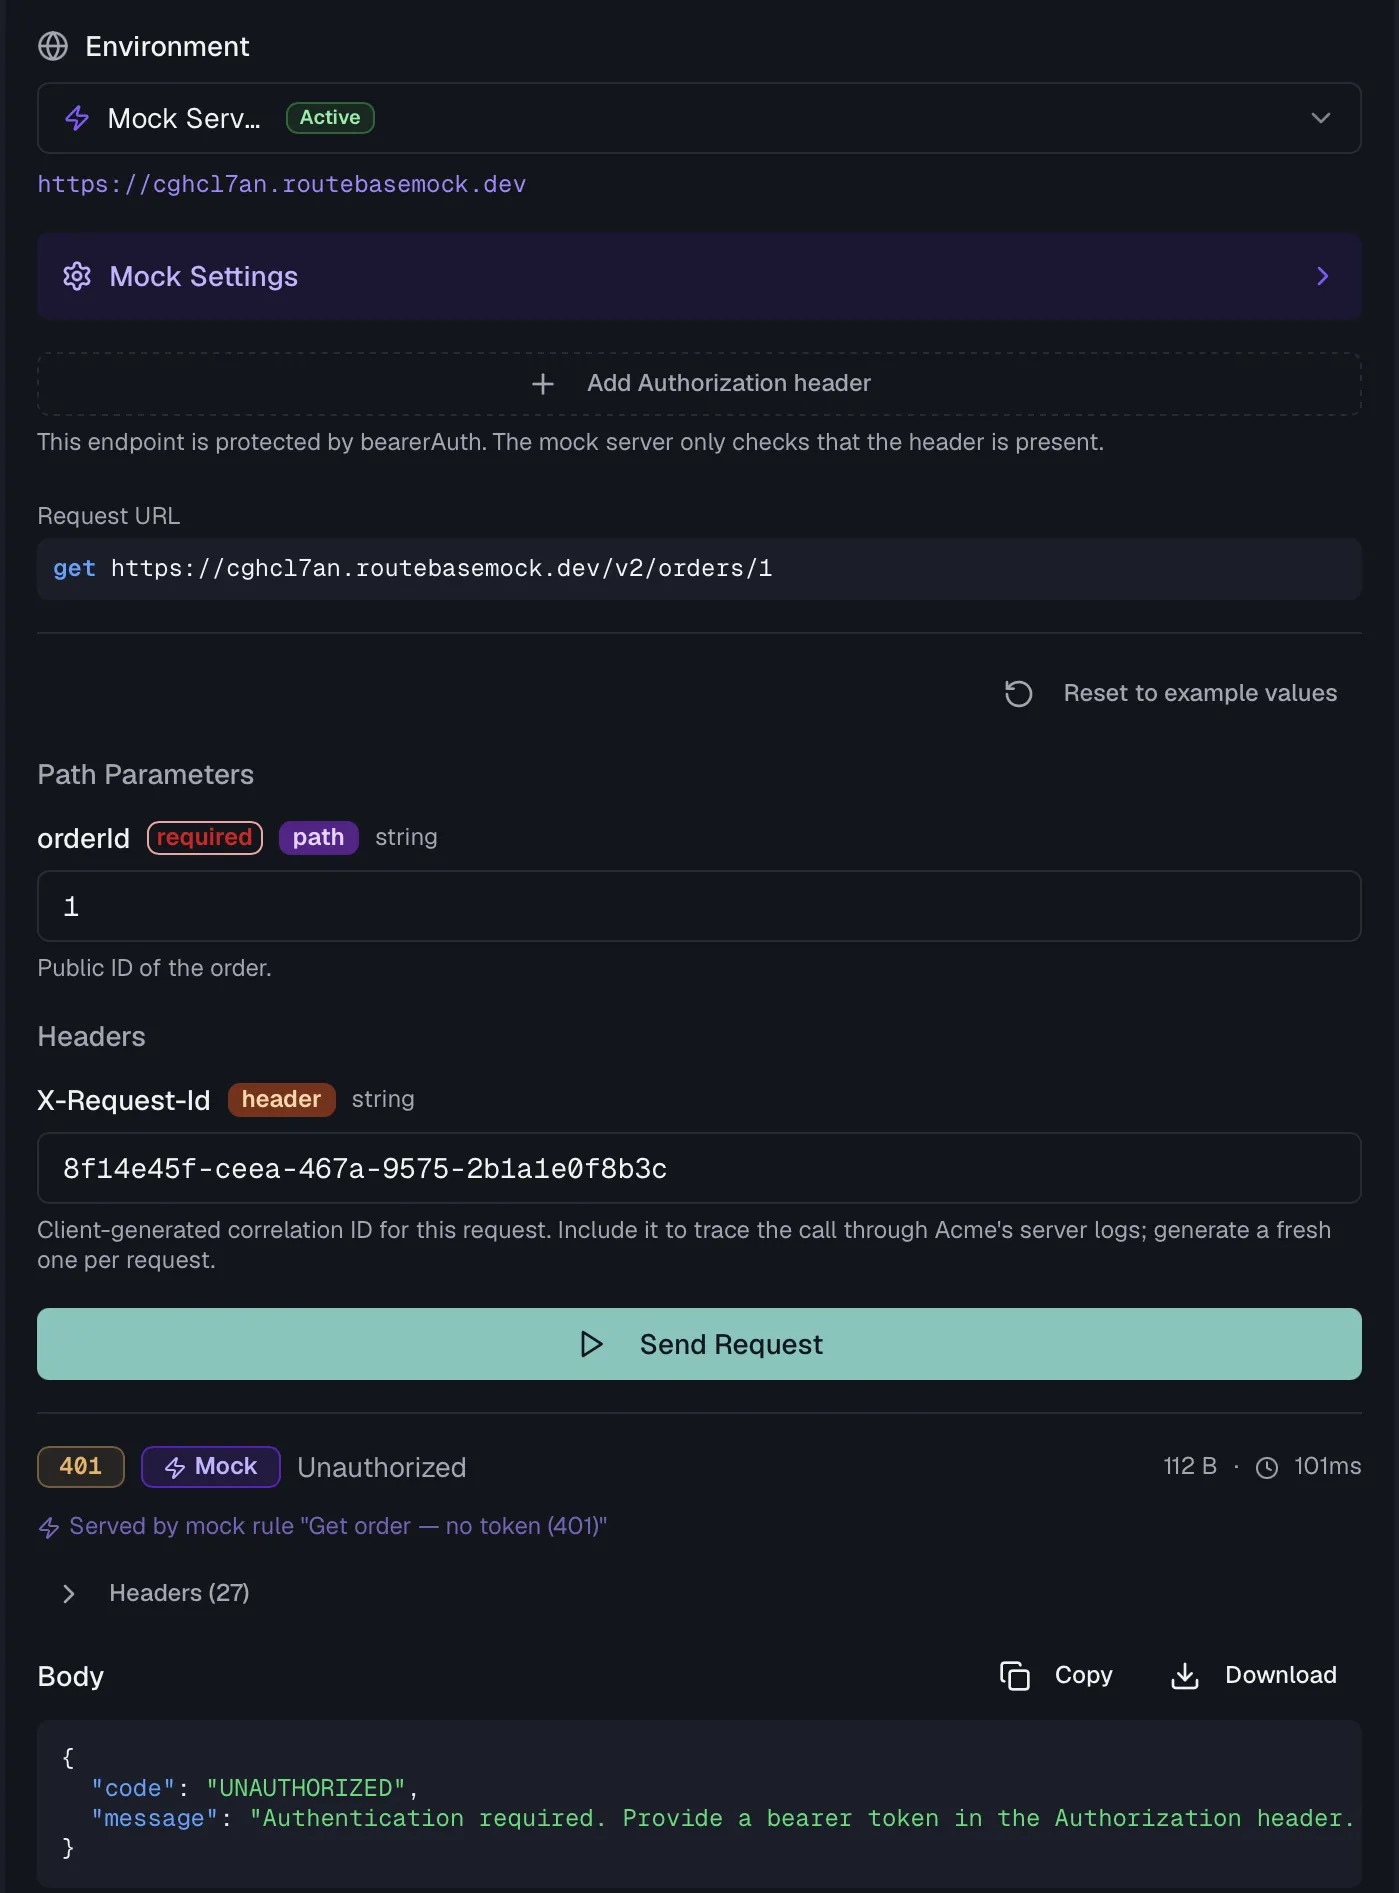
Mock Settings appear only against the mock, and they let you provoke the cases that are otherwise hard to reach. A Response Delay shows how a client behaves on a slow answer, and Error Simulation returns an error response on demand. Regenerate Mock Rule rebuilds the rule from the current schema after you change the contract.
Every request is kept in the request history of the tab, so you can go back to what you sent and compare.
Review mode — what changed since
Comparing two published versions is one thing, and seeing what you have changed while you are still working is another. The Changes toggle in the designer toolbar turns the editor itself into a diff view.
A bar appears reading "Showing changes since {version}", with a Baseline version selector, so you can compare against the last published version or any other one. Routebase picks a sensible baseline itself, and the selector is there when you want a different one. If there is only one version, it says so rather than showing an empty control.
With review mode on, the change markers sit where you are already looking:
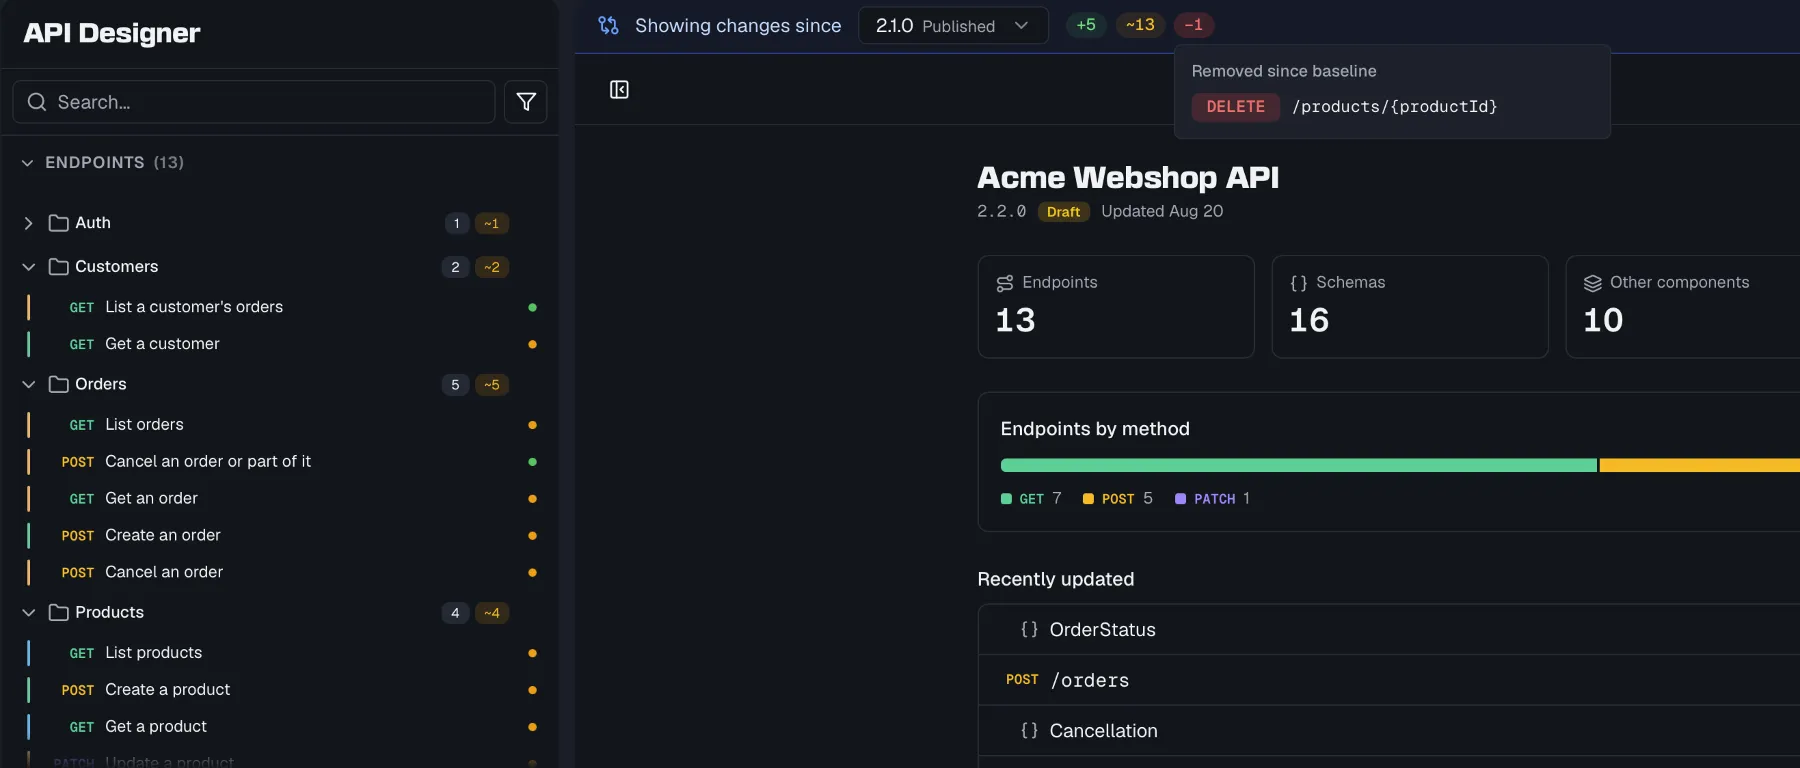
- Endpoints and schemas in the tree are marked added or modified, so you can see at a glance which parts of the API you touched.
- Entries that no longer exist appear as Removed since baseline. They cannot be marked in a tree they are absent from, so they get their own list.
- Inside the editor, the diff goes down to the property level, so response tables, request-body tables and schema tables show which individual fields changed.
It answers the question you actually have before a release, which is what you are about to publish, without leaving the place where you would fix it.
Exit review mode returns the editor to normal.
Preview, command palette, and shortcuts
- Undo and redo sit in the designer toolbar and have keyboard shortcuts. The buttons name the step they would reverse rather than only saying "Undo", so you can see what you are about to take back before you click. When there is nothing left, they say so.
- The preview panel toggles a side panel showing a live documentation preview of the selected endpoint, or the raw OpenAPI output, while you edit.
- The command palette jumps to any endpoint, schema or component, and triggers actions, from a single searchable palette.
- Keyboard shortcuts are listed in a shortcuts dialog, and you can customize them in Settings.
Permissions
Viewing the API Designer requires specs:read, and creating and editing endpoints requires specs:write. The Member role includes both. Deleting endpoints, folders and specifications requires specs:delete, which Admins and Owners have. Published versions are locked, so editing controls are hidden and a banner explains that a new version is needed. See Versioning.
Related
- Parameters — the inputs an endpoint accepts
- Responses — what an endpoint returns
- Schemas — reusable data structures referenced by endpoints
- Components — reusable parameters, request bodies, responses, and security schemes
- Versioning — draft, publish, and compare spec versions